
Quality Order Process- Sales Return
Quality Order Process- Sales Return
The Quality Order process for sales returns D365 Finance and Operations. This process ensures that returned goods are properly inspected and their quality is assessed before being restocked or processed further.
Business Case
A paper manufacturing company, “Evergreen Paper Mills,” uses D365 Finance and Operations “Evergreen Paper Mills” has sold a large Paper Reels to a printing company. The customer reports that a portion of the delivery has issues with damage and Creasing. Evergreen Paper Mills initiates a sales return process with quality inspection.
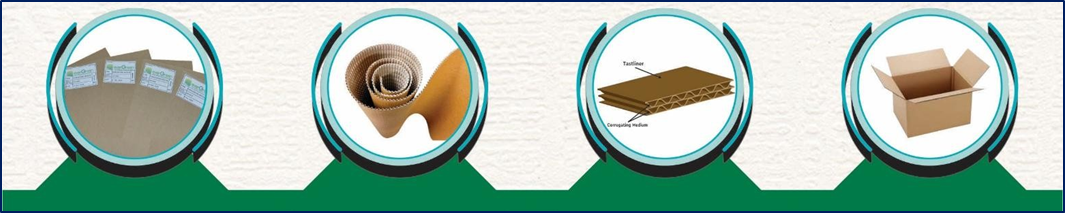
Product Line of Evergreen Paper Mill
Considering the requirements of Evergreen Paper Mills, Microsoft has introduced an Advanced Quality Management
feature in version 10.0.44, which includes a new option for Sales Return at the Quality Associate level. This new option will fully meet the requirements of Evergreen Paper Mills.
Requirements of Evergreen Paper User
Further we will require physical inspection with remarks and a final decision column in the report.
Here sometimes material returns (Paper Reel) from the customer and sometimes due to transit damage etc the material returns to the mill – we need to give our comments on these returns that come back to the mill
Pre-Requisite
There the following pre-requisite setup step before going to process execution
- Create Quality Group
- Create Item Quality Groups
- Create Item Sampling
- Create Test Groups
- Create Test
- Create Test Instrument
- Create Quality Associate
1. Create Quality Group
In Dynamics 365 Supply Chain Management, Quality Group represents a set of items that require the same quality checks. Instead of defining quality rules for each item individually, you can define them once for the group and apply them to all items within it.
Go Path: Inventory Management à Setup à Quality Control à Quality Group
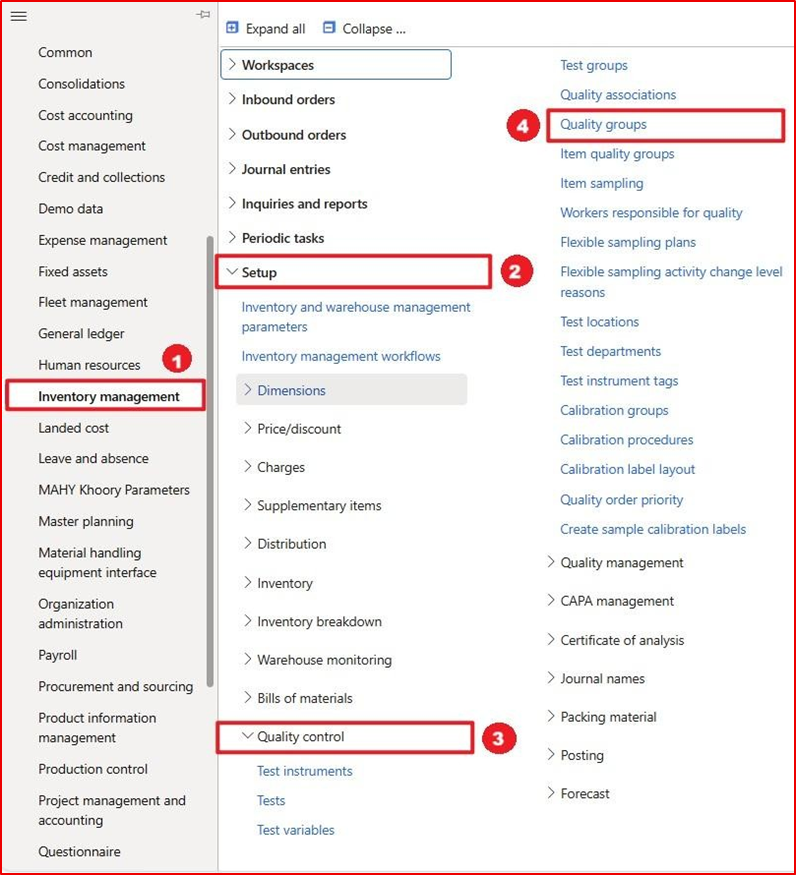
Enter or select following fields
- On Action Pane, Click a New Button
- Enter, Quality Group
- Enter, Description
- On Action Pane, Click a Save Button

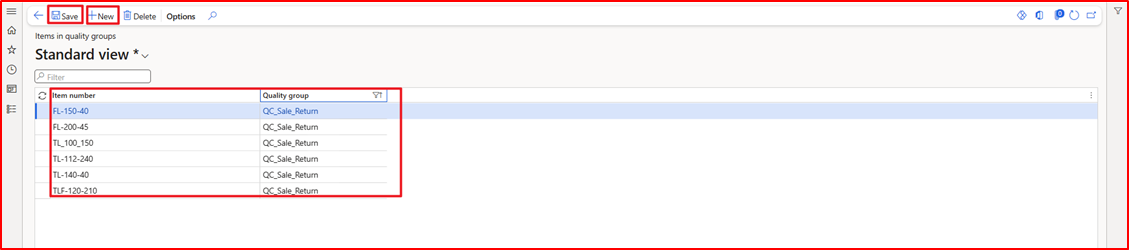
2. Create Item Quality Group
In Dynamics 365 Supply Chain Management, an Item Quality Group is a way to logically group products that share the same testing requirements. This simplifies the setup and management of quality associations and quality orders.
Go Path: Inventory Management à Setup à Quality Control à Item Quality Group
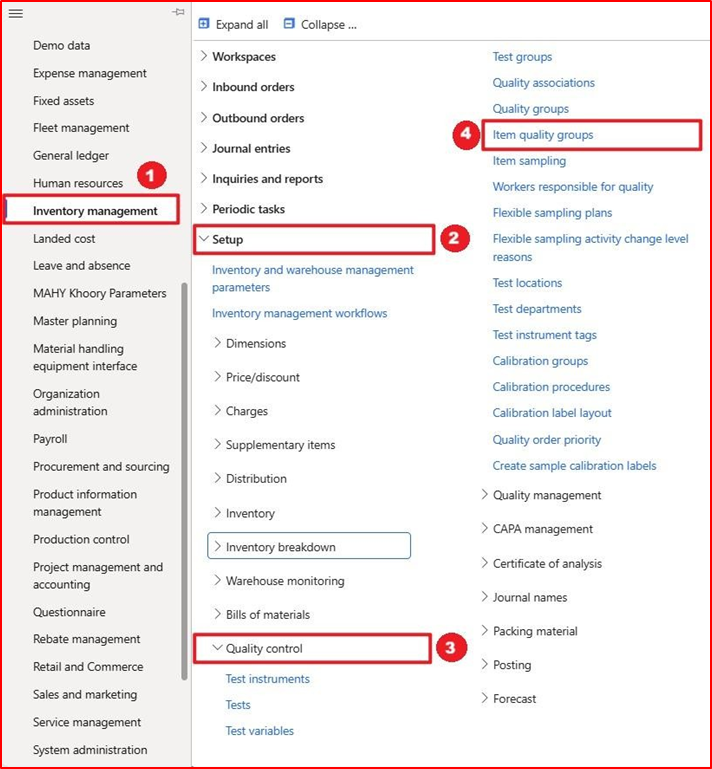
Enter or select following fields
- On Action Pane, Click a New Button
- Enter, Item Numbers
- Enter, Quality Group
- On Action Pane, Click a Save Button
3.Create Item Sampling
In Dynamics 365 Supply Chain Management, Item Sampling is a key part of the Quality Management module. It defines how much of a product’s inventory should be tested during quality control processes. Item sampling determines
the quantity of items to be inspected from a batch or lot. It is used in quality associations to automatically generate quality orders based on predefined rules.
Go Path: Inventory Management à Setup à Quality Control à Item Sampling
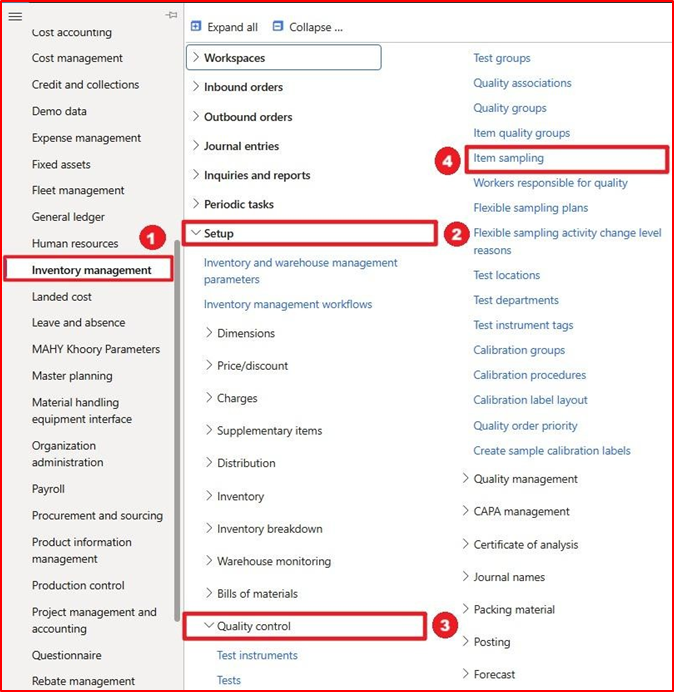
Enter or select following fields
- On Action Pane, Click a New Button
- Enter, Item Sampling
- Enter, Description
- Select, Sampling Group
- Select, Quantity Specification
- On Action Pane, Click a Save Button
4. Create Test Group
In Microsoft Dynamics 365 Supply Chain Management, a Quality Test Group is a collection of individual quality tests that are grouped together to be applied as a unit during quality inspections. These are used in quality orders to ensure consistent and efficient testing processes.
Go Path: Inventory Management à Setup à Quality Control à Test Group
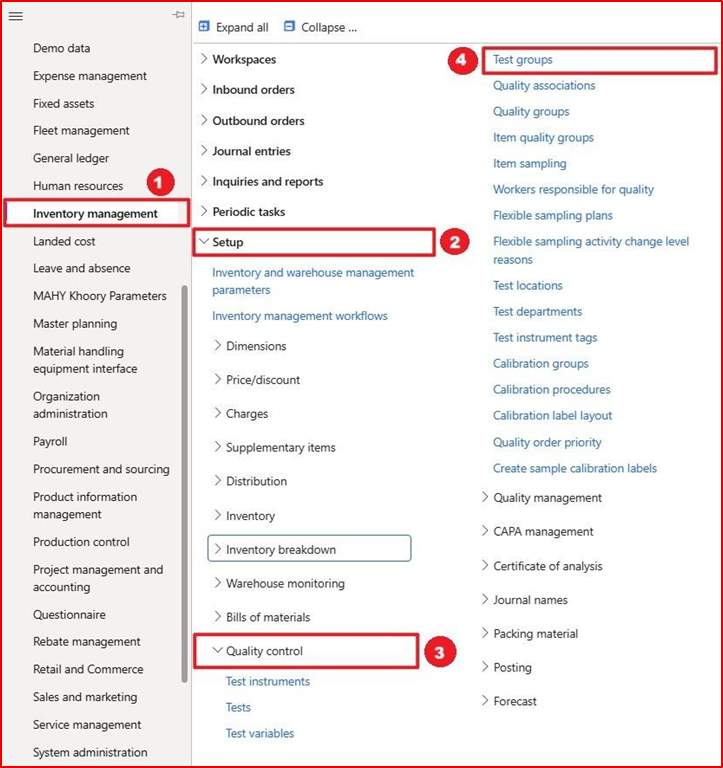
Enter or select following fields
- On Action Pane, Click a New Button
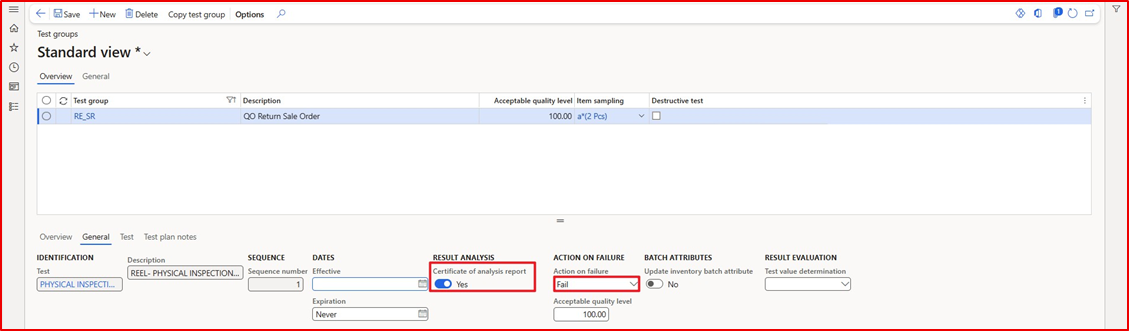
- Enter, Test Group, RE_SR
- Enter, Description, QO Return Sale Order
- Enter, Acceptable Quality Level, 00
- Select, Item Sampling, a*(2 Pcs)
- In Overview
- Click a Add Button
- Sequence, 1
- Test, Physical Inspection
- In General,
- Enabled, Certificate
- Select, Action on Failure, Fail
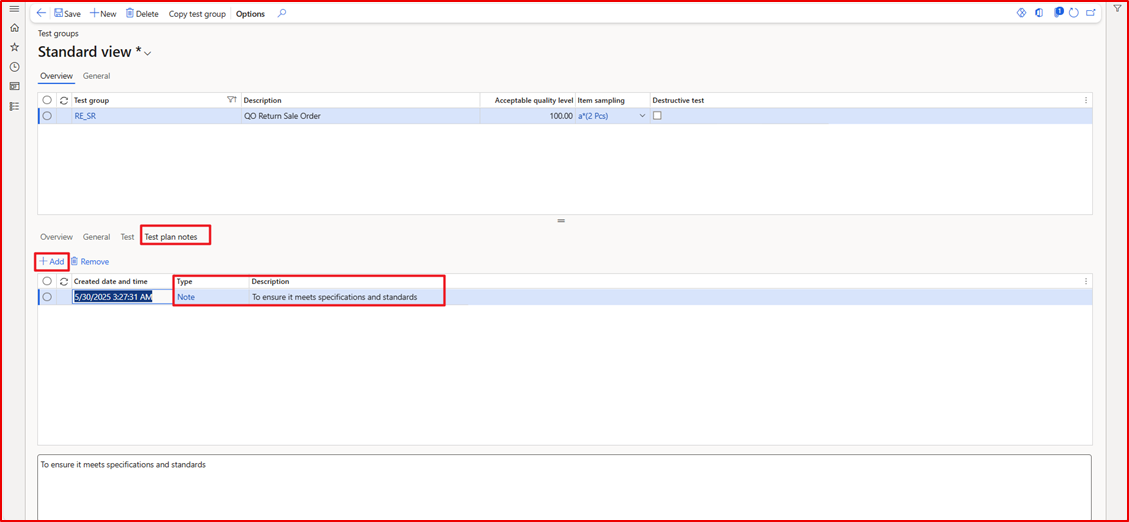
- In Test Plan Notes,
- Click, Add Button
- Select, Type, None
- Enter, Description
5. Create Test
In Dynamics 365 Supply Chain Management, a Test is a core component of the Quality Management module. It defines the specific checks or measurements that need to be performed on items during quality inspections.
Go Path: Inventory Management à Setup à Quality Control à Test

Enter or select following fields
- On Action Pane, Click a New Button
- Enter, Test
- Enter, Description
- Select, Type
- Select, Test Instrument
- Select, None
- On Action Pane, Click a Save Button

*Important NOTE: The reason “Test Instrument” is set to “None” here is because, in the Return Sales Order process, the user is only performing a physical inspection and not using any instruments.
Physical inspection means that the user will visually check the item, and any issues identified will be mentioned in the remarks.
6. Create Test Instrument
In Dynamics 365 Supply Chain Management, a Test Instrument is a tool or device used to perform quality tests on items during quality control processes. These instruments are part of the Quality Management module and help ensure that
the correct equipment is used for each type of test.
A Test Instrument represents a physical device (like a scale, thermometer, or voltmeter) used to measure specific attributes of a product during a quality test. While optional, defining test instruments can:
- Help standardize testing
- Ensure traceability of test
- Support calibration tracking (in preview features).
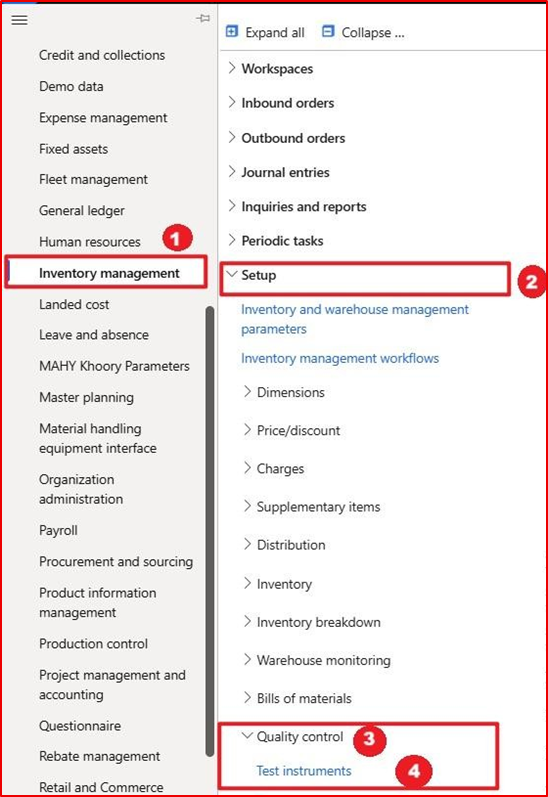
Go Path: Inventory Management à Setup à Quality Control à Test Instrument
Enter or select following fields
- On Action Pane, Click a New Button
- Enter, Test Instrument
- Enter, Description
- Select, Unit
- Enter, Precision
- On Action Pane, Click a Save Button

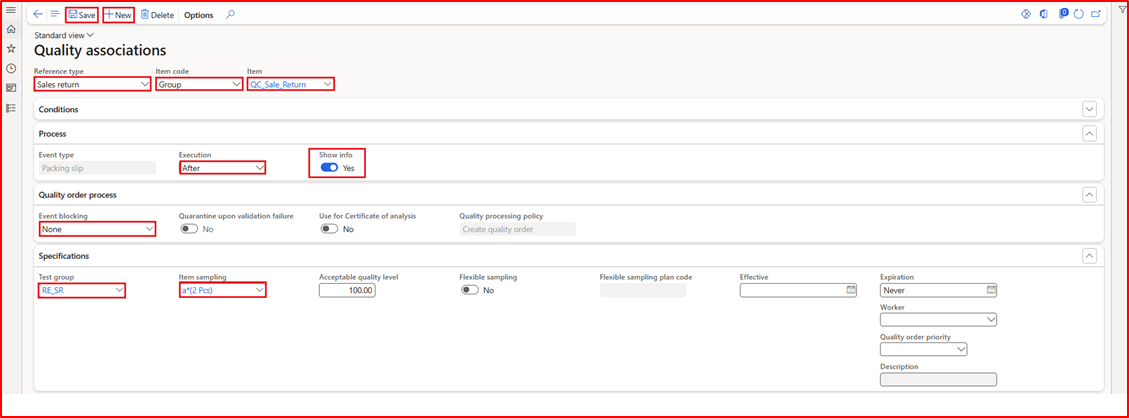
7.Create Quality Associates
In Microsoft Dynamics 365 Supply Chain Management, a Quality Association is a configuration that defines when and how quality orders are automatically generated during various business processes like purchasing, production, or sales. etc
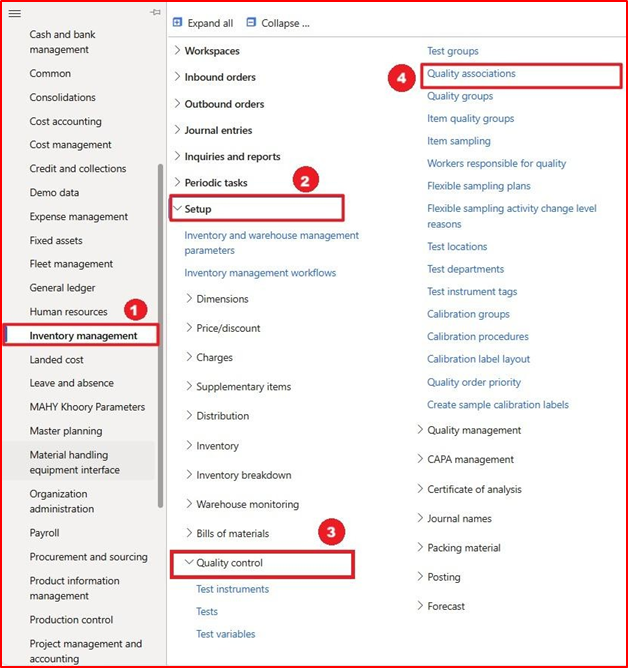
Go Path: Inventory Management à Setup à Quality Control à Quality Association
Enter or select following fields
- On Action Pane, Click a New Button
- Select, Reference Type, Sale return
- Select, Item Code, Group
- Select, Item, QC_Sale_Return
- Select, Execution, After
- Enabled, Show info, Yes
- Select Event Blocking, None
- Select, Test Group, RE_SR
- Select, Item Sampling, a*(2 Pcs)
- On Action Pane, Click a Save Button
Process Flow
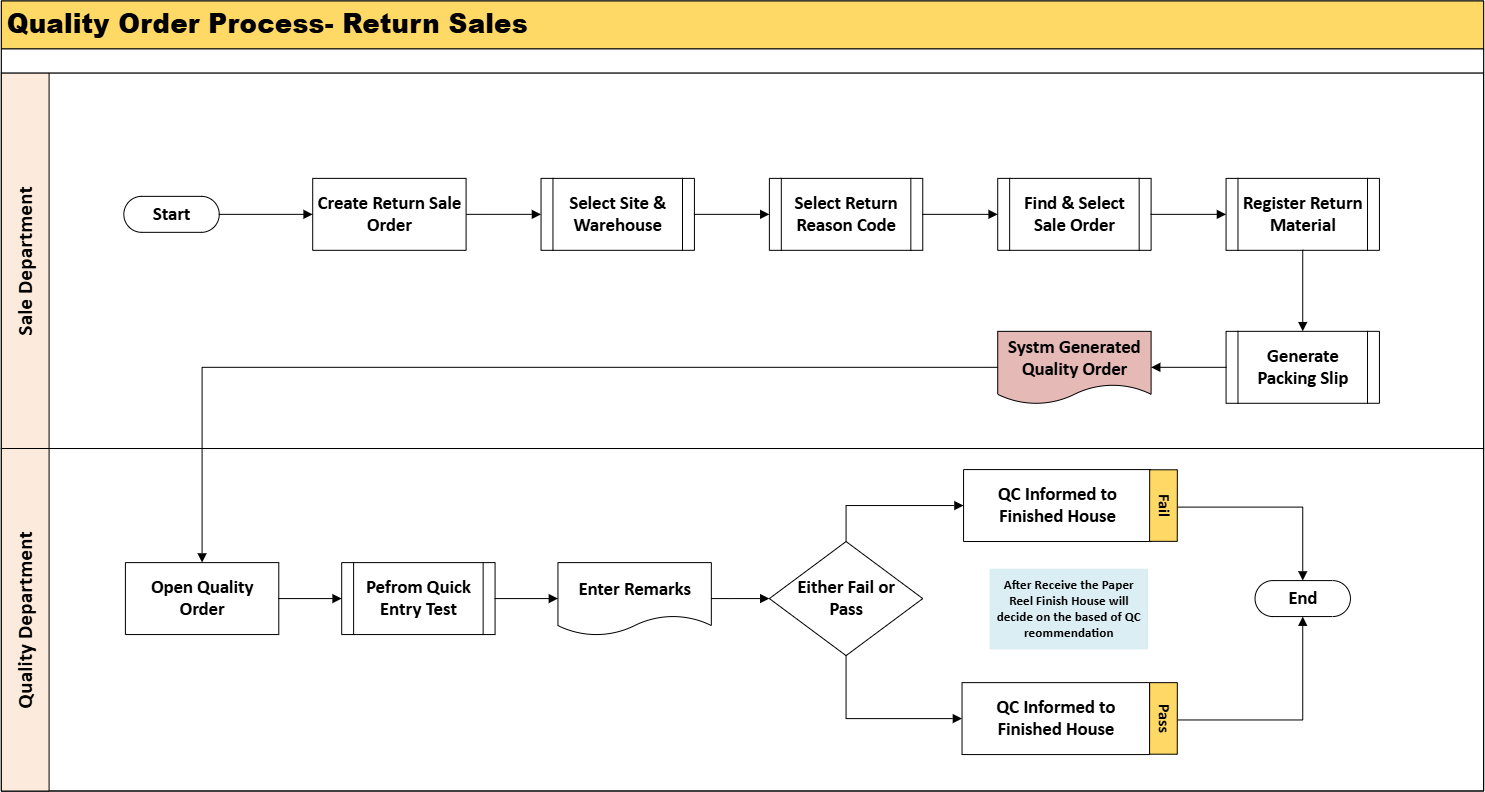
Process Description
The Quality Department of Evergreen Paper is responsible for conducting quality checks, particularly when a paper reel is damaged or has defects. This situation mostly arises as:
- When the paper reel gets damaged during truck loading
- Customer returns
In this user manual, we will outline the process for assessing the quality of returned paper reels. The Quality Department will conduct an evaluation and provide recommendations. Based on these recommendations, management will decide. The possible recommendations of quality departments
- Quality Change (Downgrade)
- Repulp of Paper Reel
- To Sell out the local market or sell to specific parties
- Partial Accept
Sale Department
The Sales Department will generate the return sales order and receive the damaged reels at the designated location. Three warehouses are involved in this process:
· FG/PM1-FG/PM2-FG Warehouse in Evergreen site 1 (UPM)
- Location: Storage
· PM3 FG, Warehouse in Evergreen site 2 (ADPM)
- Location: Storage
*Important Note: While creating a return sale order, the sales department must ensure that any damaged paper reels received are recorded in these specified locations.
Quality Control- Department
QC Department will perform QC Activity when the Sales department creates a return order for the returned from customer to keep in location.
Sale Department- Create Return Order 1.
1.Create Return Order- Overview
In Dynamics 365 Supply Chain Management, a Return Order is created when a customer wants to return goods that were previously sold and delivered. This could be due to:
- Defective or damaged items
- Incorrect shipments
- Dead on Arrival
- Wrong Quantity
- Customer dissatisfaction
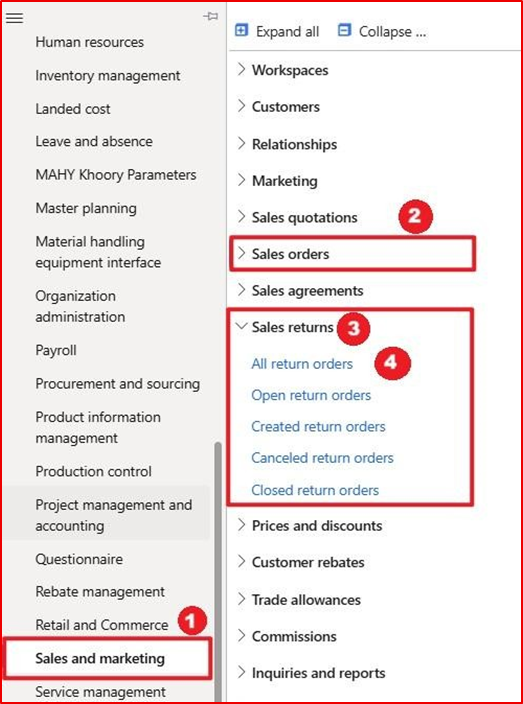
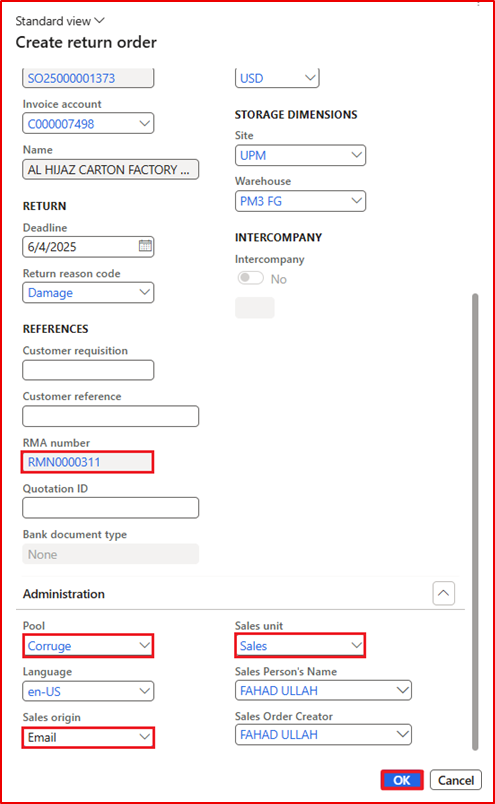
Go Path: Sale and Marketing à Sale Order à Sale Returns à All Return Orders
Enter or select following fields
- On Action pane, Click a New Button
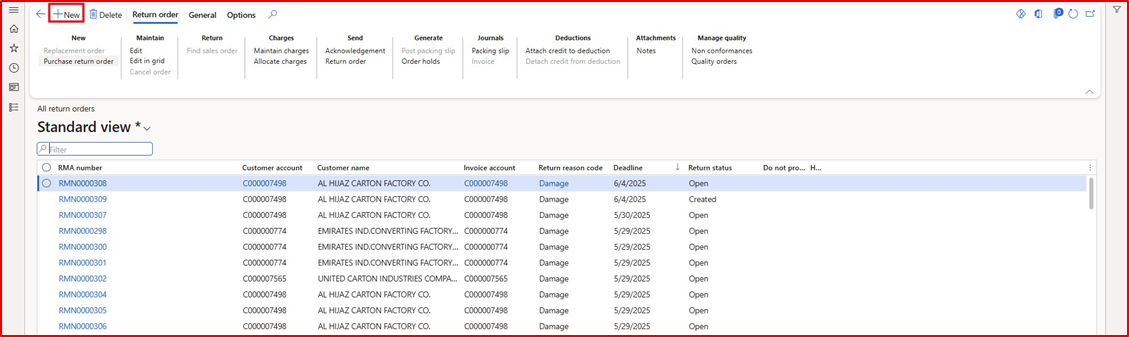
- Select, Customer Account
- In Storage Dimensions, Select- Site and Warehouse
- Select, Return Reason code

- System generates RMA number “Returned Material Authorization”
- Select, Pool
- Select, Sale Unit
- Select, Sale Origin
- Click, Ok button
Enter or select following fields
- On Action Pane, Click, Return Order
- Click, Find Sale Order
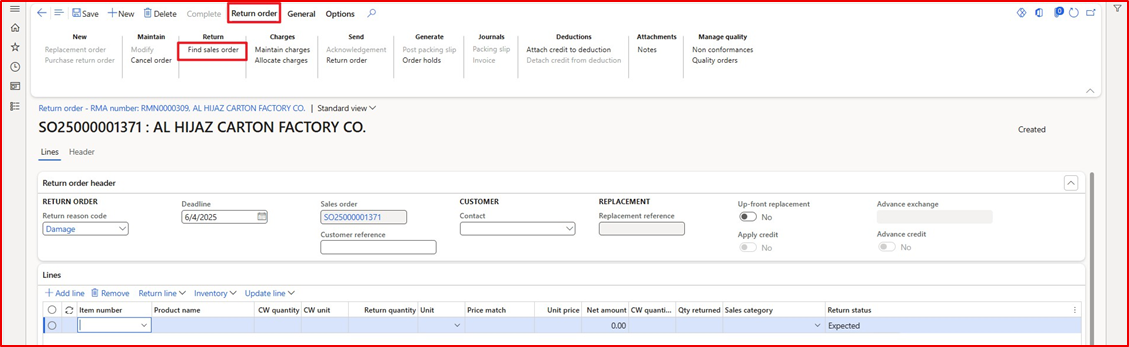
3.In Header, Select, All line
4.In Line, Select Line 1
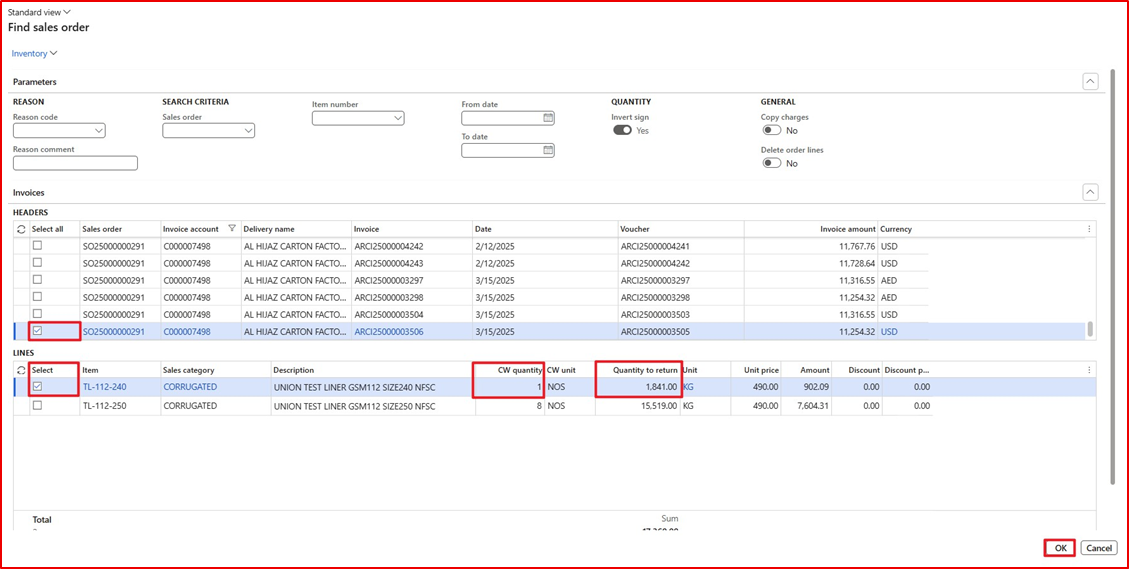
5.Enter Cw Quantity
6.System, pick Quantity to return automatically
7.Click, Ok Button
8.In Line, Click Update Line
9.Click, Registration
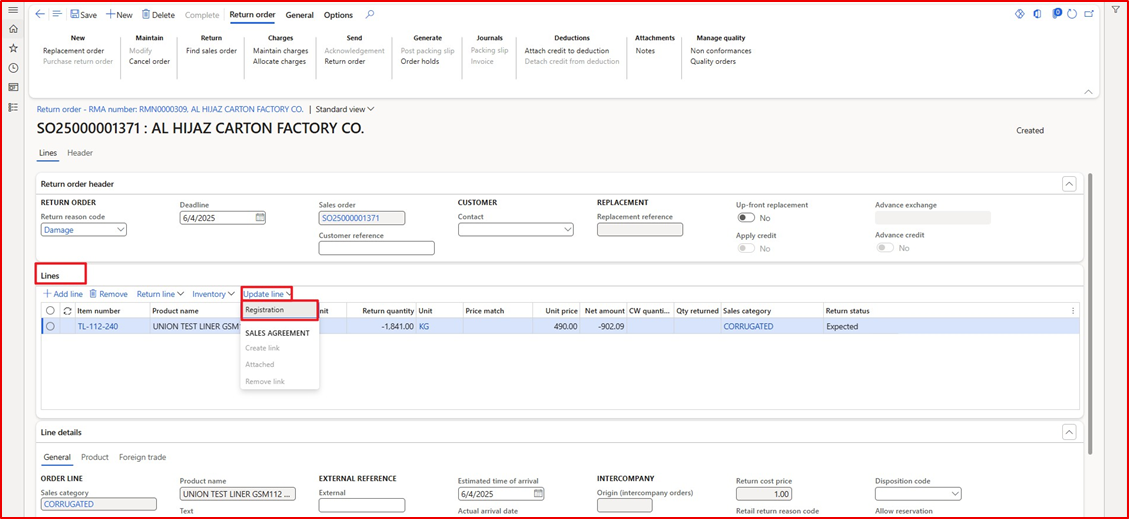
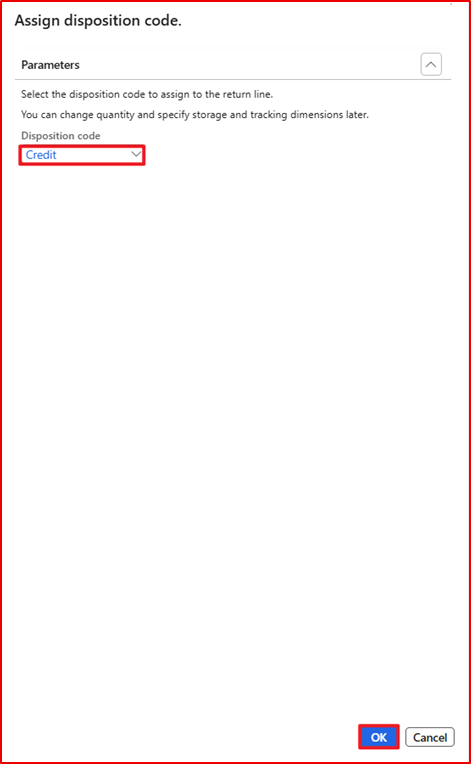
10.Select, Disposition code
11.Click, Ok Button
12.Click, Registration
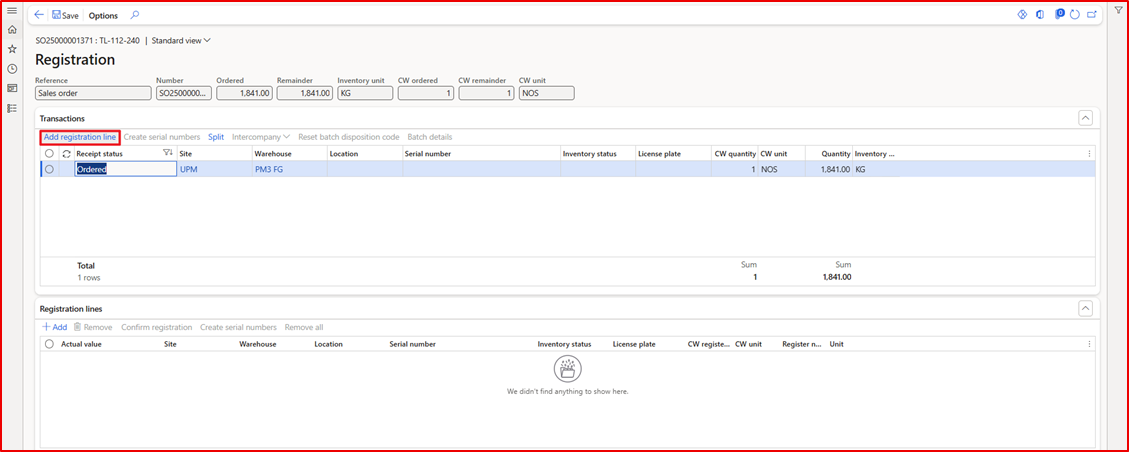
13.Select, Warehouse and Location
14.Select, Serial Number and Inventory
15.In Registration Lines, Click, Confirm Registration
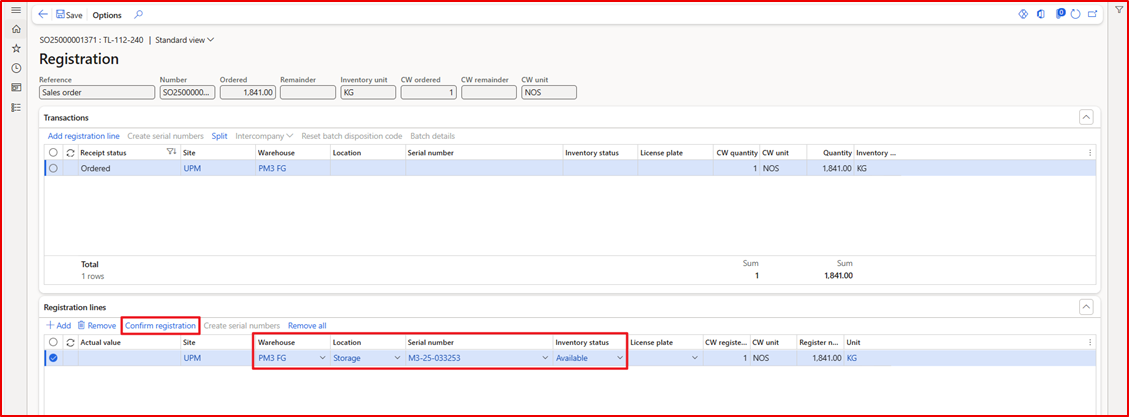
16.Receipt Status, Registered

Generate Packing Slip
Enter or select following fields
- On Action Pane, Click Return order
- Click, Post Packing Slip
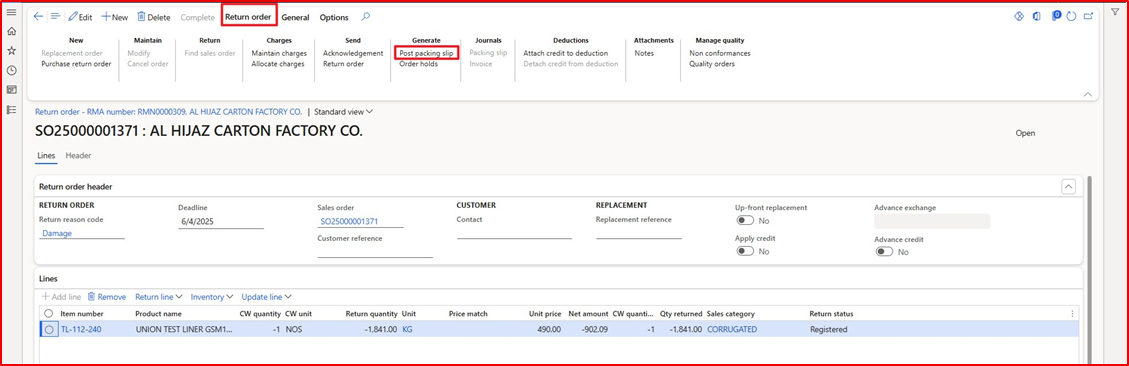
3.Customer Packing Slip, RSO #5626
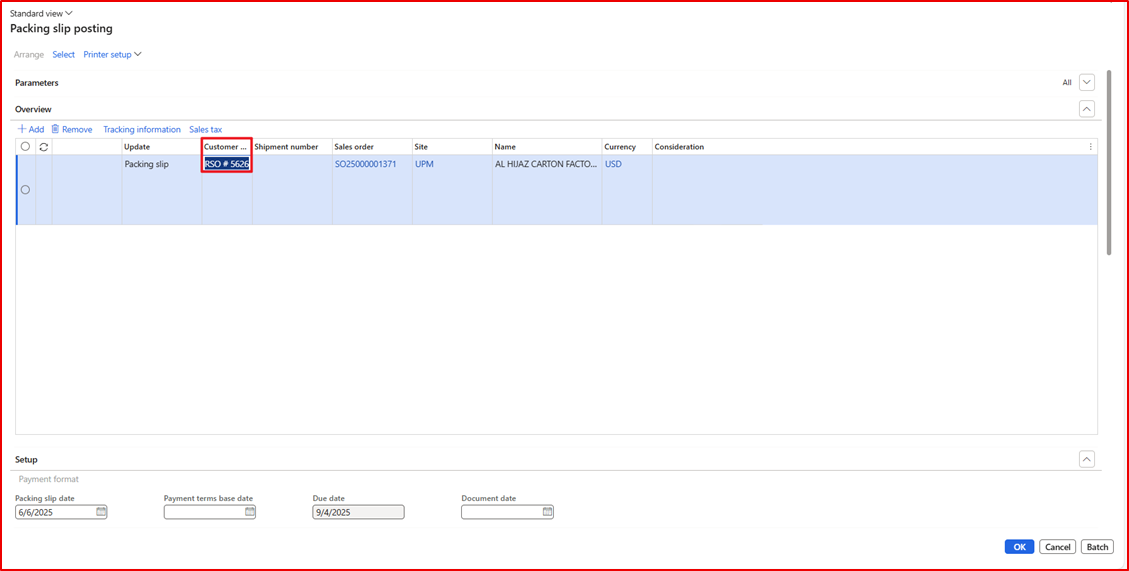
4.Enter Document Date, 6/6/2025
5.Click, Ok Button

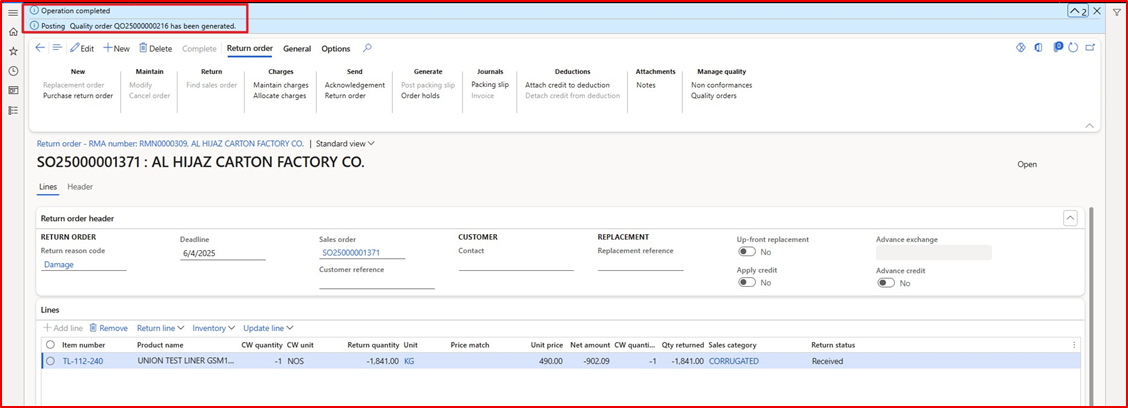
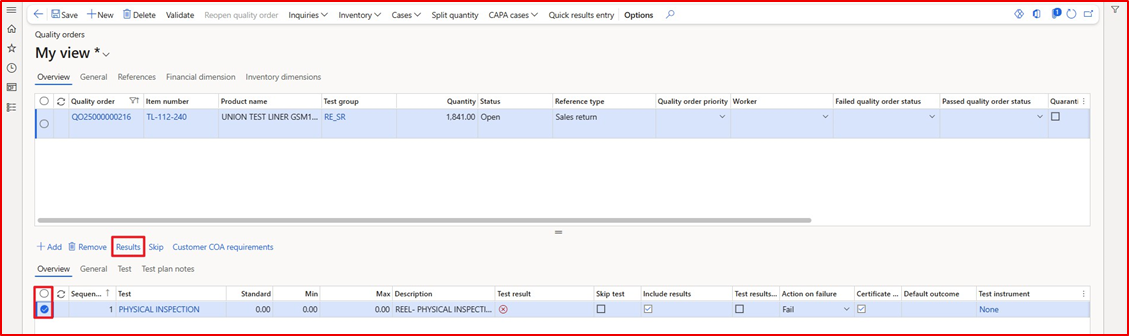
*Important NOTE: The system automatically generated Quality Order QO25000000216, as shown in the screenshot below.
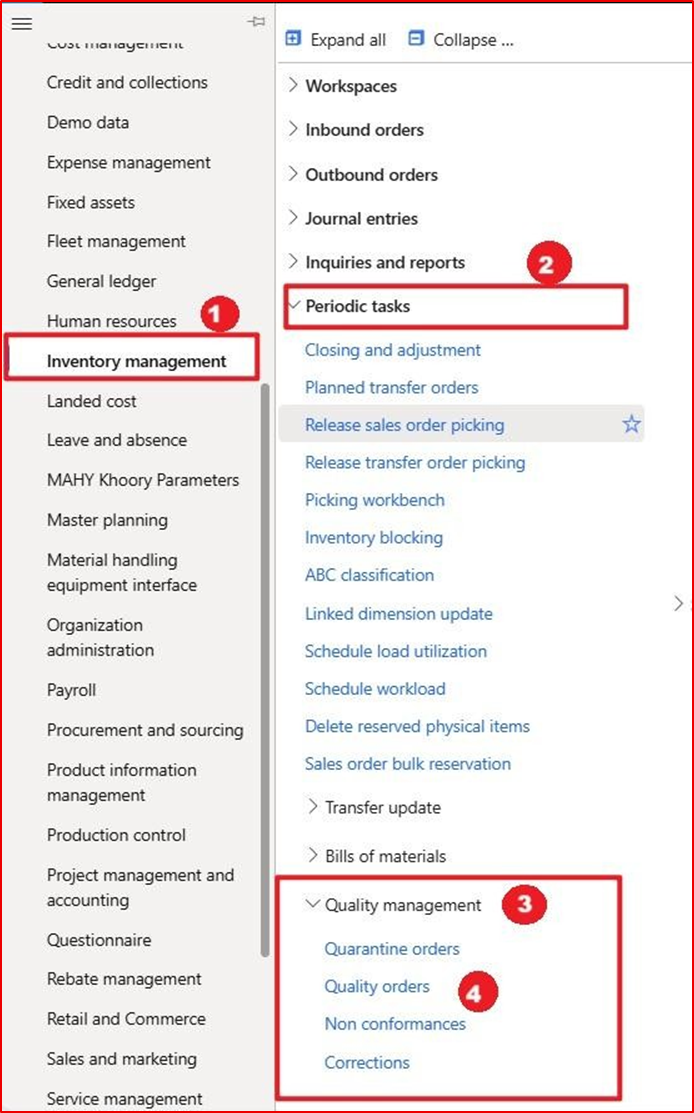
Quality Department – Quality Order
The Quality Department will receive the quality order from the Sale and Marketing Department.
Go Path: Sale and Marketing à Sale Order à Sale Returns à All Return Orders
Enter or select following fields
- On Action pane, Click an Edit
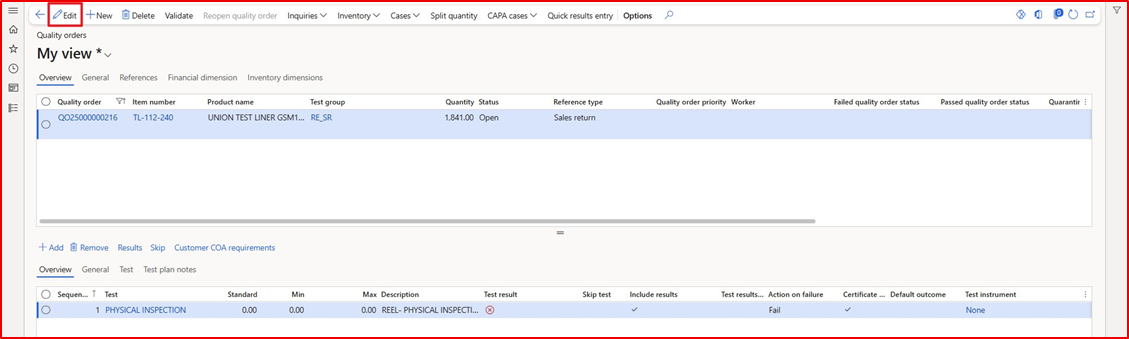
2.Select, Line
3.Click, Results
4.On Action Pane, Click, Quick Result Entry
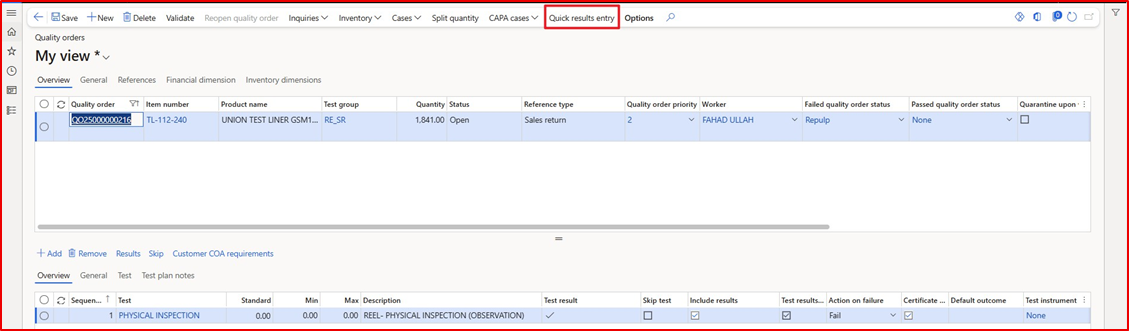
*Important NOTE: The Quick Entry Result is a new feature introduced by Microsoft in version 10.0.44. It was not
available in earlier versions. This feature allows users to view and enter results for all tests in a single window, without having to open each test one by one. This will save a significant amount of time for users, especially since there can be 15 or more tests to manage
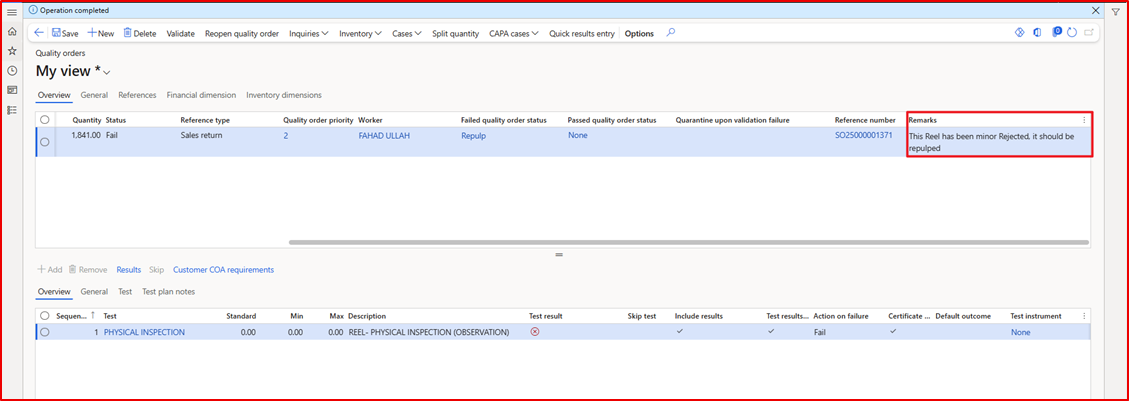
5.Enter Remarks
6.Enter, Result Value
7.Click, Validate
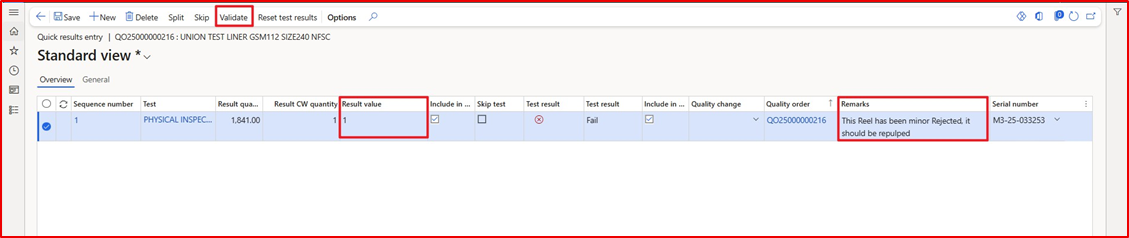
*Important NOTE: I must enter the value because the user’s requirement is to record the “open value,” meaning they will write whatever they physically observe in the remarks.
Considering this requirement, the test configuration has been done based on ” friction” (categorization), because if we had used the option-based method, we would have needed to define a list of options. So, if we input a result value, we’ll have to give it as “1”, which will be considered a failure case. If I want to accept the item, I won’t enter any result value, and it will be considered as accepted.
However, in this document, a rejected/fail case has been shown because usually, in customer return scenarios, the material received is mostly defective or has some issues in the finished goods.
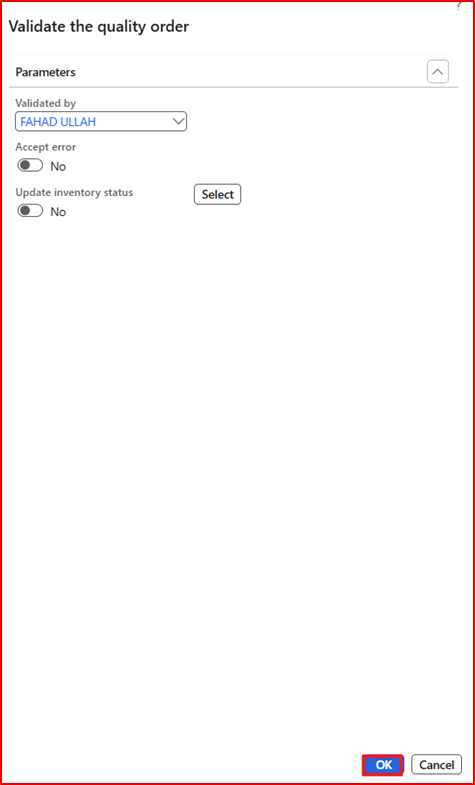
8.Select, Worker
9.Select, Failed Quality order status
10.Select, Passed Quality order status
11.Enter, Remark
12.On Action Pane, Click, a validate’
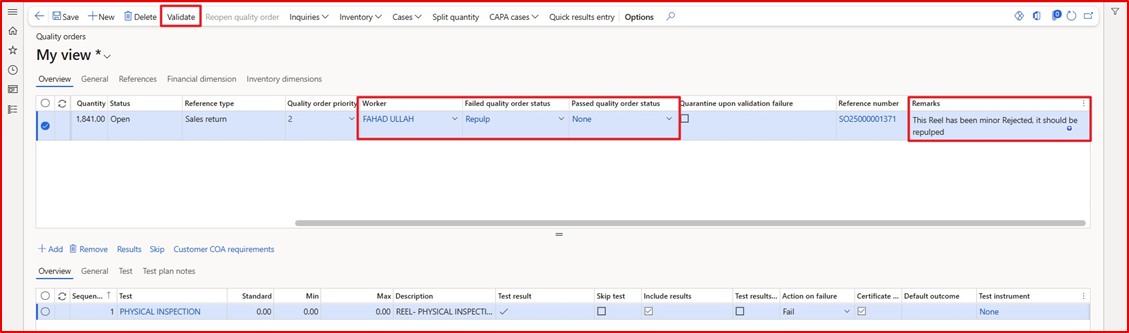
13.Click, Ok Button
14.Now Quality order process Completed and QC will take the report and sent to concern department


Leave a Reply
You must be logged in to post a comment.

