
Engineering Change Management 365 Finance
Engineering Change Management 365 Finance
Engineering Change Management (ECM) capabilities in Microsoft Dynamics 365 Supply Chain Management bring enhanced structure and governance to the product data management process. They enable controlled, workflow- driven procedures for defining, releasing, and revising products.
By leveraging product versioning and ECM, organizations can systematically document, evaluate, and implement engineering changes across the entire product lifecycle. These advanced capabilities—unique to Dynamics 365 and not available in SAP SCM—empower manufacturers to respond efficiently to evolving requirements and market dynamics, all within a disciplined and traceable framework.
Why we need Engineering change management
How many times have you had users in the system who make unauthorized changes to a released product that caused issues down the line? With the release of D365 Finance and Operations, new functionality was introduced with Product versioning and Engineering change management. This functionality allows for the product setup,
editing, etc., in the ‘engineering’ or owning company within your environment. After the product is set up, it can be released to other ‘operational’ legal entities to use or manufacture the product. Using this functionality provides structure to the process of product maintenance and enables product updates to be controlled by the engineering company that can also be supported by workflow.
Key Components of Engineering change management
Engineering Change Management in Microsoft Dynamics 365 comprises several key components that contribute to its effectiveness:

- Centralized Product Data Management: – Incorporating an engineering organization and implementing a managed release process in Microsoft Dynamics 365 ensures accurate and relevant product data This centralized approach streamlines data management, reduces errors, and fosters efficient collaboration across the enterprise.
- Product Versioning: – Tracking changes through product versions enables organizations to maintain control throughout the supply By managing and controlling versions at each stage, manufacturers can effectively monitor product evolution, ensuring consistency and adherence to quality standards.
- Product Lifecycle Management: – Organizations can manage product data visibility across the entire organization and control product version availability throughout the supply chain. Detailed control mechanisms each product version is used in appropriate business processes, maintaining product integrity and alignment with operational requirements.
- Engineering Change Management: – With this feature, users across the organization can request changes to products, initiating the engineering change Engineering change orders, supported by workflows, help assess and document the impact of proposed changes.
- Also, workflows play a vital role in managing the entire engineering change process, ensuring efficient
collaboration and timely execution.
- Readiness Control: – To ensure comprehensive and accurate product data before release, Microsoft Dynamics 365 offers readiness control features. System checks and user guidance, including questionnaires and checklists, help ensure that all necessary product data is fully populated, minimizing errors and optimizing the product release process.
Enabling Engineering Change Management Feature
A few features and license configuration keys must be enabled before engineering change management and product versions can be used. The procedure starts with enabling the following features:
Engineering Change Management (essential for enabling other engineering change management features)
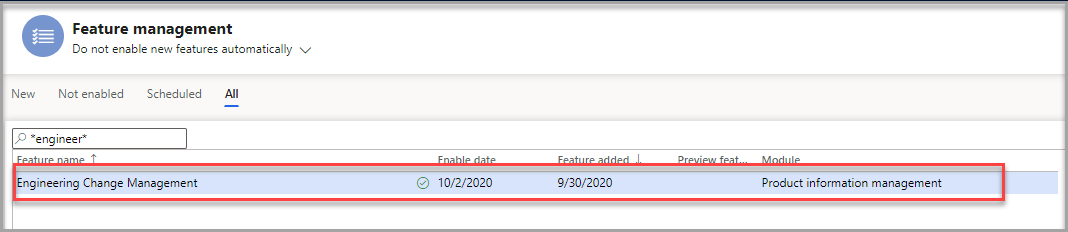
- Go to System administration > Workspaces > Feature
- Select the All
- Search for ‘Engineering change ’
- Select the Enable button in the lower right of the
- If you would like to use Engineering change management on existing products, you must enable the ‘Enable change management on existing products ‘feature as Once enabled, you must convert the relevant products to engineering items (also referred to as engineering products).

- Versioned products are engineering products in Engineering change management. The versioning functionality enables the engineers to track the history of a Enable the Product dimension version.
- Product version dimension – It is optional but is required to track the version dimension of the products in transactions.
When the environment is removed from maintenance mode, the database will be synchronized automatically if it is a Tier 2 environment. It should be synchronized manually if it is a Tier 1 environment (development environment).
Once Engineering Change Management (ECM) is enabled, a dedicated module titled “Engineering Change Management” becomes available within the system. This section provides a brief overview of the foundational configurations required to begin using ECM effectively
Create an Engineering Organization
The first step in setting up Engineering Change Management is to establish an Engineering Organization. This entity serves as the parent company responsible for engineering product creation and lifecycle management.
For streamlined governance and simplified product maintenance, it is recommended to maintain a single engineering organization. To create one, navigate to the “Engineering organizations” form within the system and define the appropriate details.
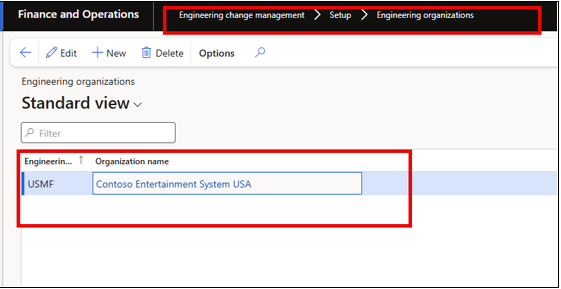
- Go to Engineering change management > Setup > Engineering organizations.
- Select New to add a row to the grid, and set the following values for it:
- Engineering organization: USMF
- Organization name: Contoso Entertainment System
Create Version Number and Version Number Rules
The “Version numbers” and “version number rules” must be created as the next step. A version number tracks changes and modifications made to an engineering product. There are three options for the number versions, which are called version rules:
Auto – This will generate a version number based on the format configured. The format could be V-##. This will result in the first version released will be V-01.
List – The new version number is defined based on the order of a predefined list. Suppose the list is A, B, and C. The first product will get version.
Manual – You must manually enter the new version number when releasing a new product version.
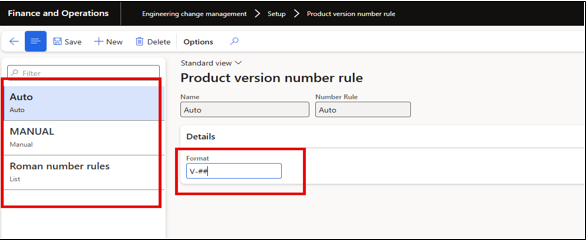
- Go to Engineering change management > Setup > Product version number rules
- Select New
- For the Name, enter Roman Numeral List
- For the Number rule, select List
- Expand the Version fast tab
- Select Add
- Enter I, II, III, IV, V as your list sequence
- Close the form
Create Engineering Attributes
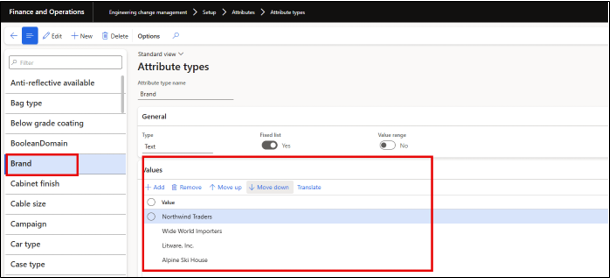
The “Engineering attributes” (basically the same as “Product attributes“) are to identify the details needed to maintain for the product. It could be things like the brand, model, and so on. The attributes can be associated with a category and a particular product.
Go to Engineering change management > Setup > Attributes > Engineering attributes.

The “Attribute types” from the “Engineering attributes” define the attribute values. An Attribute type
can be different types of data depending on what values need to be stored.
Create Product Readiness Policies
When engineering products are created, the first option is to select the Engineering Product Category. The category will have both readiness and release policy options to attach to it.
This feature provides a check to ensure that all the required master data has been specified for a product before it can be used in transactions. Only when a readiness check has been validated can a product be released or used in transactions. There are three types of readiness checks included in each policy:
| Type | Check |
| System Check | The system will check if there is a valid recording according to the policy setup |
| Manual Check | User will verify if the record is valid |
| Checklist | This will require that the user answers a series of questions from a checklist |
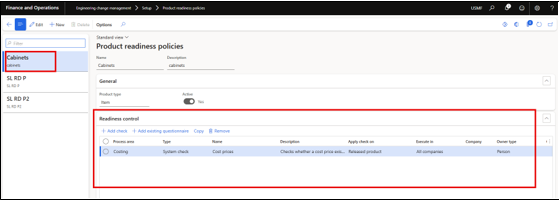
To create the readiness policies, follow these steps:
- Go to Engineering change management > Setup > Product readiness policies.
- Create New
- Enter Name and Description
- Select Product type and whether the policy is active or
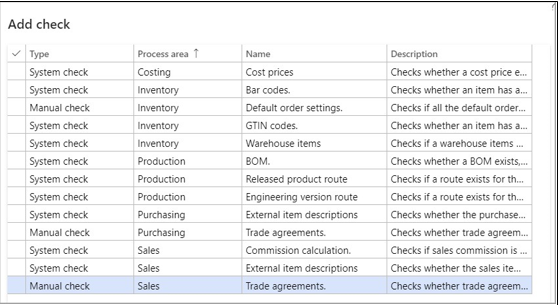
- In the Readiness control Fast Tab select Add check
- The application has 13 checks to choose
1.1 Create Product Release Policies
When engineering products are created, the first option is to select the Engineering Product Category. The category will have both readiness and release policy to attach to it.
To create the policy, follow these steps:
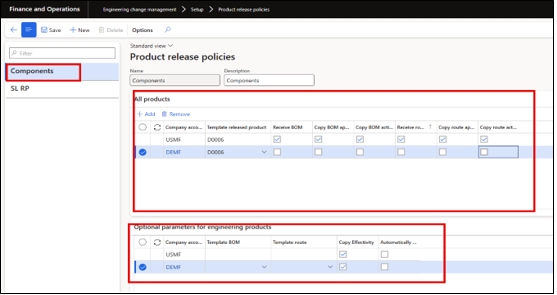
- Go to Engineering change management > Setup > Product release The policy is set up as follows:
- Enter the header information:
| Field Name | Usage |
| Name | User-created identifier |
| Description | Description of policy |
| Product type | Item or service |
| Apply templates | Always, Optional, never |
- On the All-product Fast Tab, select Add and select the following criteria as it pertains to this Product release policy:
| Field | Description |
| Company accounts ID | Select the legal entity this line of policies will refer to. |
| Template released product | Choose which template will be used for the legal entity selected |
| Receive BOM | Select Item or service |
| Copy BOM approval | Copies the BOM approval to the receiving company |
| Copy BOM activation | Copies the BOM activation to the receiving company |
| Receive route | Copies the route to the receiving company |
| Copy route approval | Copies the route approval to the receiving company |
| Copy route activation | Copies the route activation to the receiving company |
Create Engineering Categories
To set up an engineering product, an engineering category must be assigned. The category indicates default values, attributes, and policies. Each category establishes the default behavior of the products in that category. Once a product is assigned to a category, it cannot be changed. The only solution for removing a product from a category is to delete it and then re-create it in another category. Follow these steps to set up a new category:
- Go to Engineering change management > Setup > Engineering product category
- Select New.
- Enter the category name and select the Engineering
- In the Default FastTab, select the values that are applicable for the
- In the Attributes FastTab, select the attributes applied when a new product is released to legal
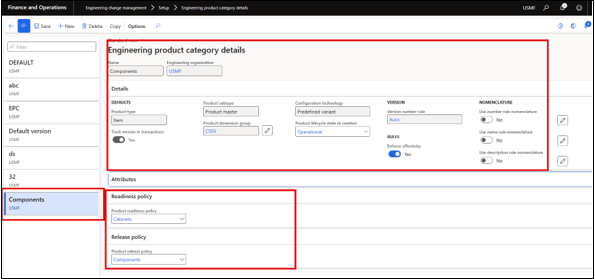
- On the Readiness policy and Release policy Fast Tabs, select a policy that you configured in the previous
Create Engineering Severities & Rules
Engineering severities indicate the level of impact that applies to the products in an engineering change order.
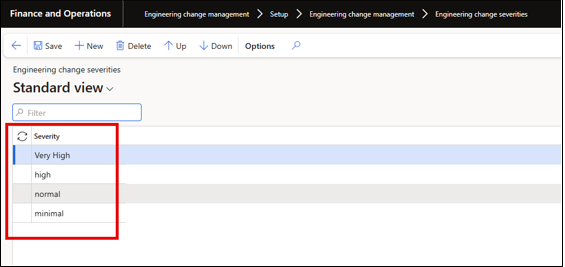
Severity rule sets are used to calculate the severity of the change order automatically. When the system evaluates a severity, it will process the rules configured in the parameters. To use them for this, open the parameters page and set the Severity Rule field to Calculate or Calculate automatically.
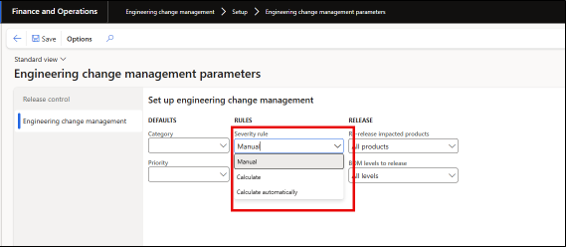
To setup, the severity rules, follow these steps:
- Go to Engineering change management > Setup > Engineering change management parameters.
- On the Engineering change management tab, under Rules, select the applicable
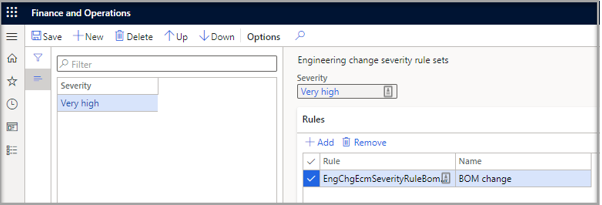
Five separate rules can be selected to apply to the different severities that are set up. The system will process the rules in which they appear on the page, from top to bottom. To create a rule set, follow these steps:
- Go to Engineering change management >Setup > Engineering change management > Engineering change severity rule sets.
- Select New
- Select the Severity from the drop-down list from the severities that have been
- Select Add in the Rules fast tab
- Select from the Rules in the drop-down list, which are paraphrased below:
- The overall impact of the change
- Route change
- Attribute change
- BOM change
- Document change
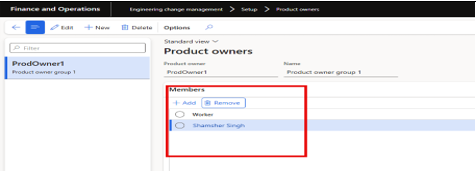
Create Product Owners
A product owner is a group of users who are responsible for specific engineering products. When a product owner group is assigned to a product, only the group members can release the product to the operational, legal entities. The product owner can also be used in the approval workflows. Product owners are assigned globally; therefore, they are available to all legal entities. To create a product owner group, follow these steps:
- Go to Engineering change management > Setup > Product owners.
- On the Action Pane, select New.
- In the Product ownerfield, enter a name for the
- In the Namefield, enter a description of the
- On the MembersFastTab, add the workers who should be members of the
To initiate the Engineering Change Management (ECM) process, a procurement clerk from DEMF created a change request to update the formula component of the acoustic foam panel. A disruption in the supply chain compelled the procurement team to procure a newer version of the chemical used in production. Following the submission, the purchasing manager from USMF reviewed the change request through an established workflow and subsequently routed it to the Engineering department or Product Manager for further review and action.
Here we are going to take a very Simple example, there are many more scenarios available under the Engineering change management which we will cover after we understood the simplest one first
In this example, USMF serves as the parent company and DEMF as the operational entity. An engineering item has already been set up under DEMF, designated as ECM_001 with version V-002. The associated Bill of Materials (BOM) for this item is defined accordingly.
In response to the updated requirements, the BOM is now slated for modification by replacing item M0006 with item M007. With these details in place, let’s begin the process within the Dynamics 365 environment.
1.1 Create New Engineering change request
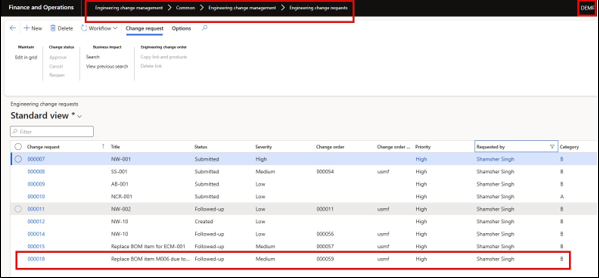
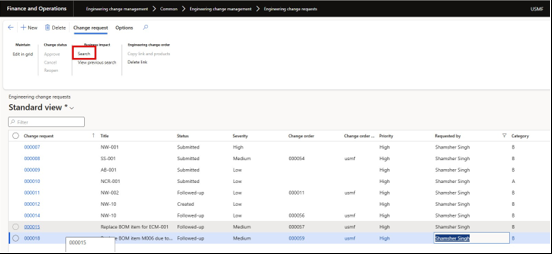
To initiate a change request, navigate to: Engineering Change Management > Common > Engineering Change Management > Engineering Change Requests.
This opens the Engineering Change Request form, where users are required to enter the necessary information relevant to the proposed product modification. It’s important to note that Engineering Change Requests can be raised from various locations within Dynamics 365 Finance and Operations, providing flexibility for users across different roles and departments to initiate changes efficiently.
- Navigate to the Engineering Change Request form & Click the New button to create a new request. (We are going to create this change request in DEMF)
Fill in Basic ECR Details
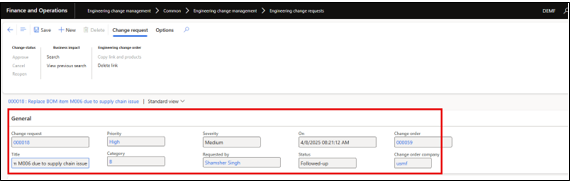
- Fill in the basic information for the request:
- ECR ID: Auto-generated or manually
- Title: Provide a concise title summarizing the
- Priority: Choose the appropriate priority from the drop-down
- Category: Select the relevant category from the drop-down
- Severity: Choose the severity level from the drop-down
- Click on the Save button
Fill in ECR information Details
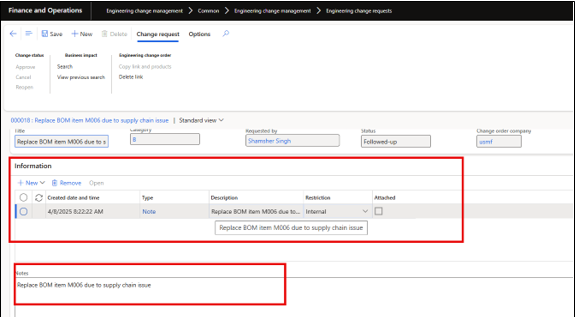
- In the ECR Information section, click the new
- Select the file type to be For example, choose “Note” if you’re adding textual documentation.
- Description: Enter a brief overview or summary of the attachment or supporting
- Notes: Provide detailed information relevant to the change request—this may include justification, technical specifications, or any other critical content required for
Add Affected Items under the Product Tab
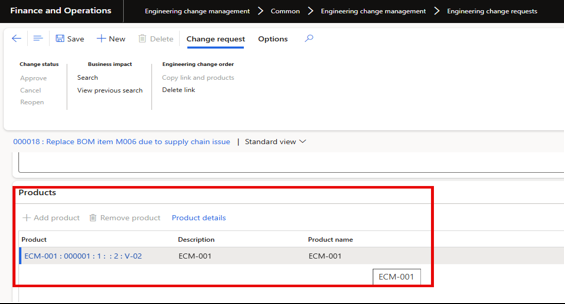
- Navigate to the Product tab within the Engineering Change Request
- In the Affected Items Fast Tab, click
- Select the item(s) that are subject to the
- These are typically the products for which Bill of Materials (BOM) components will be modified as part of the change request.
- Submit for Review / Approval
- Once all required details have been entered, click the Submit button to initiate the ECR approval workflow (if configured).
- The system will automatically route the Engineering Change Request through the predefined workflow stages, such as:
Draft → In Review → Approved / Rejected
- Review and Approve the ECR in the Parent company (USMF)
- Switch to the USMF legal entity (the parent company) to proceed with the ECR approval
- The approver (e.g., Product Manager or Engineering Lead) should locate and open the submitted Engineering Change Request for review.
- Use the Search function within the action pane to identify any open transactions in the system that are associated with the item under change.
- Engineering Notifications for Production: – The Engineering Notifications feature allows you to inform relevant departments—such as Production—about changes made to engineering products currently in use or under manufacturing. To create a notification:
- Navigate to Engineering Change Management > Engineering Change
- In the Action Pane, click on Search under the Change Request
- From the list of requests, select the appropriate ECR and initiate a notification to alert the production team of the pending or approved changes.
When the Engineering Change Request form opens, it will display the areas impacted by the proposed change. From this view, you can use the “Notify” option to send targeted notifications to the relevant departments or stakeholders affected by the change—such as production, planning, or procurement.
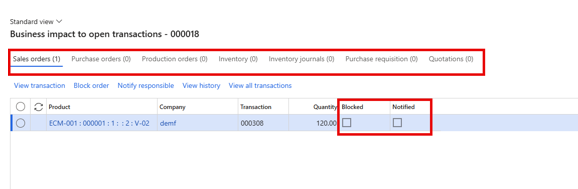
- Sales orders – Notify responsibly – Will notify the user set as responsible for the sales
- Purchase orders – Notify ordered – Will notify the user set as ordered on the purchase
- Production orders – Notify production – Will notify all users responsible for any resource related to the production order.
- Purchase requisition – Notify preparer – Will notify the user set as a preparer for the purchase
- Quotations – Notify sales responsible – Will notify the user set as responsible for the
- Approve the change request: – After thoroughly reviewing the details of the Engineering Change request, the approver can proceed with the approval process.
- To approve, simply click the “Approve” button on the form,
Approve the request through the workflow process, if an approval workflow is configured.
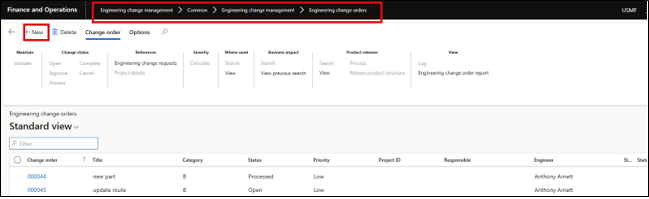
Creating an Engineering change request (ECO)
Once an Engineering Change Request (ECR) is approved, you can proceed to create a Change Order to implement the proposed modifications
Create a Change Order Manually
Create a change order from the change request :- Alternatively, a Change Order can be created directly from the
Change Request form:
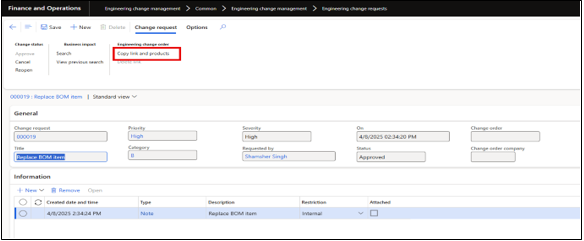
- Click on the “Copy link and products” button in the ECR
- A new form will open with two options:
- New – to create a new Change
- Add – to link the request to an existing Change
- Click the “New” button
- The system will auto-generate a new Change Order and automatically populate it with information from the ECR.
- Fill in the following details:
- Title – Provide a clear and concise description of the
- Severity – Select the appropriate severity from the drop-down
Configure Impacted Product:- Navigate to the impacted products section
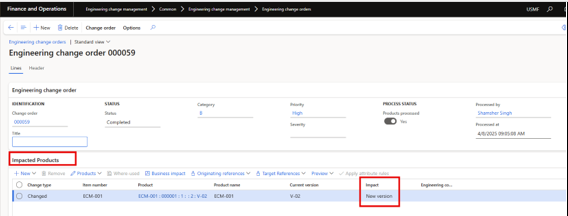
- In the Impact column, change the value from “None” to “New version”.
- Go to the Product Details tab to verify that a new product version has been
- The new version number will be displayed under the “New Version”
Change Information: – After the new version has been generated, users can record detailed change information for traceability and documentation purposes.
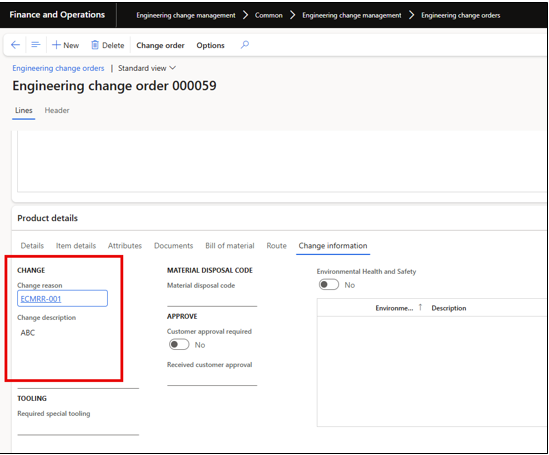
- Navigate to the Product Details tab within the Change
- Click on the “Change Information”
- Complete the following fields:
- Change Reason: Select the appropriate reason for the change from the drop-down list (e.g., design improvement, supplier update, compliance requirement).
- Change Description: Enter a clear and detailed description of the This field should capture the purpose, scope, and any relevant notes to justify the change.
- Modify the Bill of Material (BOM):- To implement the required changes to the Bill of Materials (BOM) for the new product version:
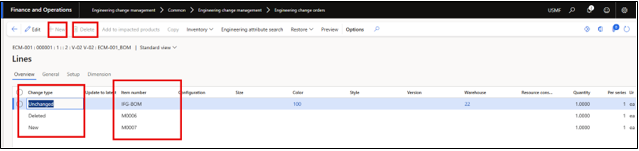
- In the Change Order form, navigate to the Bill of Material
- Click on Lines to view the existing BOM
- Review the list of BOM lines. Locate the item to be replaced (e.g., Item M0006).
- Select Item M0006 and click the Delete The Change Type will automatically update from Unchanged to Deleted.
- Click the New button to add the replacement
- Enter the new item number, along with the appropriate:
- Quantity
- Per series value (if applicable)
- Click Save to confirm the new BOM
- Return to the Change Order
- Under the Product Details tab, click the Approval button to approve the modified BOM
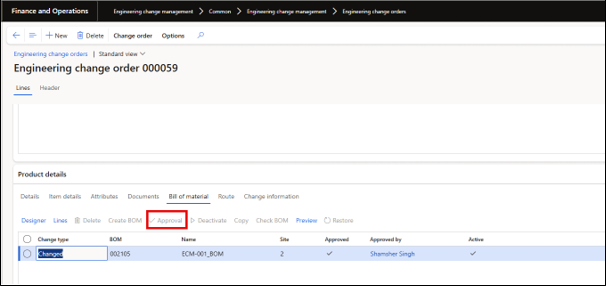
- Click Validate to ensure all required changes are completed and the change order is ready for
- Submit the change order for Review / Approval:- Once all required changes (e.g., BOM modifications, versioning, and documentation) are completed, the Change Order must be reviewed and approved.
- Click Submit to initiate the Change Order approval workflow (if a workflow is configured).
- The system will automatically route the Change Order through the defined workflow stages:
Draft → In Review → Approved / Rejected
- If no workflow is set up, the user can manually approve the Change Order by clicking the “Approve”
button.
- Upon approval, the status of the Change Order will update accordingly, and the changes will be officially registered in the system.
Process the change request: – After the Change Order is approved, the final step is to process the request so that the changes are reflected in the system and a new product version is created.
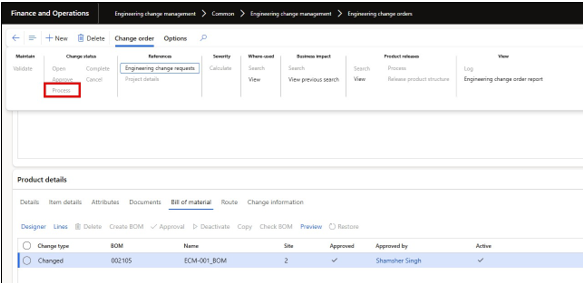
- In the Change Order form, navigate to the Change Status
- Click the “Process”
- Go to Released
- Locate and select the item (e.g., ECM_001).
- Click on Engineering
- Select the newly created version (e.g., V-003) and click
Note: If the new version is not activated, the system will not allow you to release the item to other legal entities (companies).
- Release product structure to operational company: – After activating the new version of the product, you need to release it to the appropriate operational company (e.g., DEMF) to make it available for use in production or transactions.
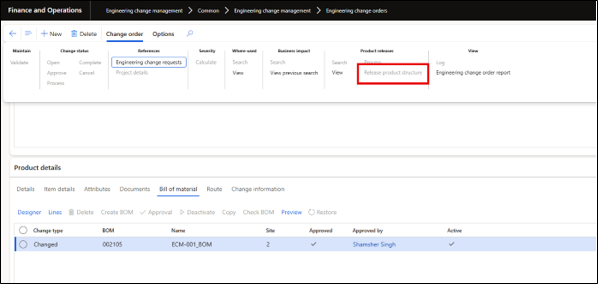
- In the Change Order form, click on “Release Product ”
- In the wizard that opens:
- Define the Site (e.g., where the product is manufactured or stored).
- Select the Item you wish to
- Click
- On the next screen:
- Select the Target Legal Entity (e.g., DEMF).
- Define the Receiving Site in
- Click Next, then
- After the release is successful, click the “Complete”
- This action updates the status of the Change Order to Completed, marking the end of the Engineering Change process.
The item and its new version are now successfully released and available in the operational company for use.
Verified the new Released Version under DEMF
After the product version has been released to the operational company (e.g., DEMF), follow the steps below to
verify and accept the new version:
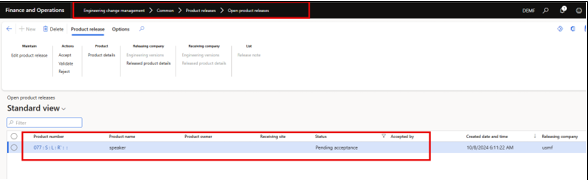
Navigate to: Engineering Change Management > Common > Product Releases > Open Product Releases
Locate the newly released item. It will appear with the status: “Pending acceptance”
- Click the Validate button to ensure the released item is correctly
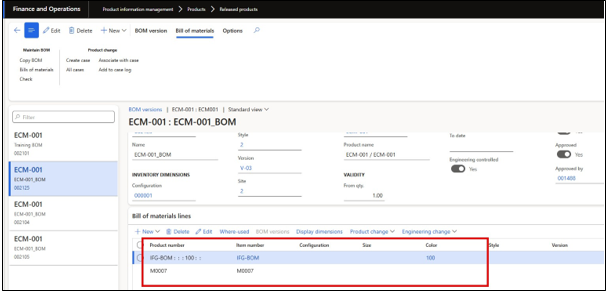
- Click on the Engineering Version
- Verify that all relevant details are present under Version V-03.
- Review the BOM Lines to confirm that the modifications made earlier (e.g., replacing Item M0006) are reflected accurately.
- Click on Readiness Checks, and when prompted, click Yes to
- Click the Accept button to complete the release
- Upon acceptance, the item will no longer appear in the “Open Product Releases” list, indicating successful completion of the product release in DEMF.


Leave a Reply
You must be logged in to post a comment.

