
D365 F&O Warehouse Management systems (Advance warehouse)
D365 F&O Warehouse Management systems (Advance warehouse)-4
In D365 F&O, work templates define the procedures for warehouse transactions, outlining steps like picking, putting away, and more, for specific work order types (e.g., purchase orders, sales
orders).
Here’s a more detailed explanation:
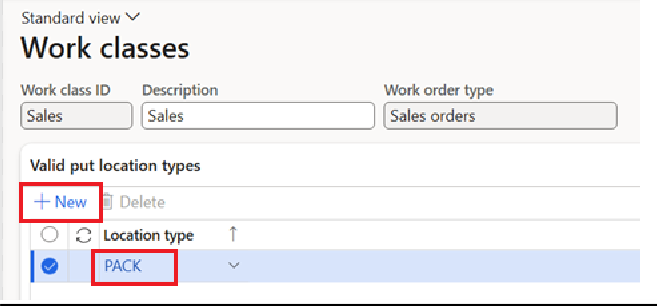
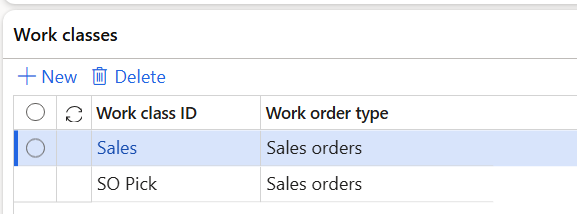
Work classes
In Dynamics 365 Finance and Operations (D365 F&O), work classes are used to control the type of work order lines that warehouse workers can process on a mobile device and to validate the put location for a work order line.
Here’s a more detailed explanation:
- Purpose:
Work classes help define which types of work (e.g., picking, putaway, loading) are associated
with a specific menu item on a mobile device, ensuring that workers only see and perform tasks that are appropriate for their role and the current process.
- Functionality:
- Linking to Mobile Device Menu Items: You can link work classes to specific menu items on the mobile device, allowing you to control which work types are
accessible through those menus.
- Work Order Line Validation: Work classes can be used to validate the put location for a work order line, ensuring that items are placed in the correct locations.
- Control over Warehouse Work: By using work classes, you can have more control over the work that is created and processed using mobile devices.
- Go to Warehouse management > Setup > Work > Work
- Click
- In the Work class ID field, type a
- In the Description field, type a
- In the Work order type field, select an

- Click
- In the Location type field, type a
- Close the
Example:
You might create a work class called “SO Pick” for sales order picking and another called “SO Load” for loading sales orders and then link these work classes to the corresponding menu
items on the mobile device.
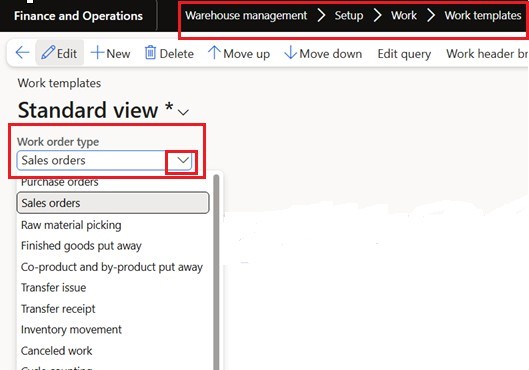
Work Templates
- Purpose:
Work templates are used to define the procedures and steps that should be followed when executing a warehouse transaction.
·Work Order Types:
Each work template is associated with a specific work order type, such as purchase orders, sales orders, transfer orders, or cycle counting.
·Warehouse Automation:
They help automate warehouse operations by defining the expected workflow for different types of transactions.
·Example:
When receiving a purchase order, a work template might define steps like picking items from the truck and putting them away in a bulk storage location.
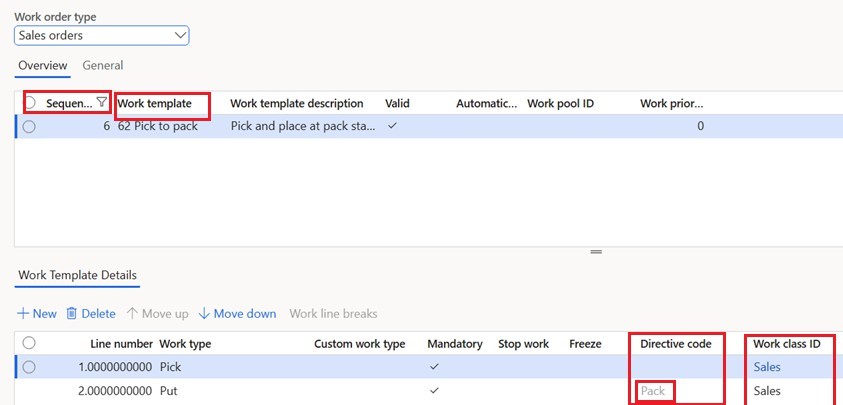
When selling, a work template will define the steps of picking items from warehouse and putting them either in Pack or Ship location.
When producing, a work template will define the steps of picking items from warehouse and putting them in Production warehouse raw material pallet/supermarket or Bin location
How to Set Up Work Templates:
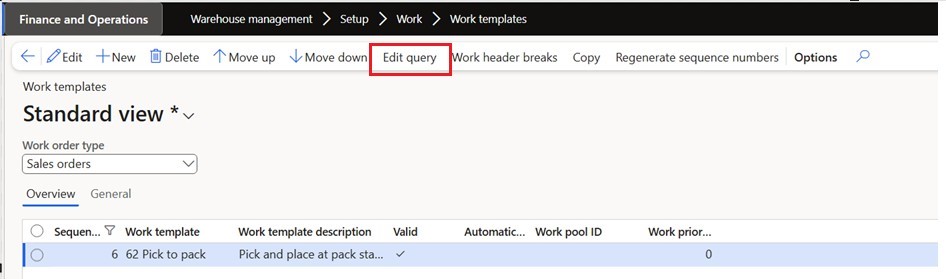
- Navigate to Work Templates: Go to Warehouse Management > Setup > Work > Work
- Create a New Template: Select “New” to create a new work
3.Define Header Information:
- Sequence Number: This determines the order in which the work templates are
- Work Template ID: This is the unique identifier for the
- Work Template Description: A description of the
- Work Order Type: Select the type of work order this template applies to (e.g., Purchase Order, Sales Order).
- Work Pool ID: Allows you to organize work into
- Work Priority: Indicates the importance of the
- Edit Query (Optional): You can use the “Edit Query” button to refine the selection criteria for the work template.
- Save: Save the work template
- Add Lines: Add lines to the work template to define the specific steps and
- Associate with Location Directives: Work templates can be associated with location directives to further control the warehouse operations.
Mobile device Menu Item.
Mobile device menu item is used for performing the work for any type of order. The work class that’s associated with the menu item determines which work is valid.
Navigation
Warehouse Management > Setup > Mobile device > Mobile device menu items
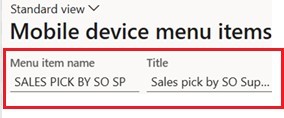
Select New

In the Menu item name field, type a value. Enter a unique value.
In the Title field, type a value. This is the title which will be displayed on the mobile device
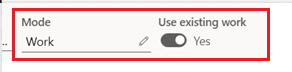
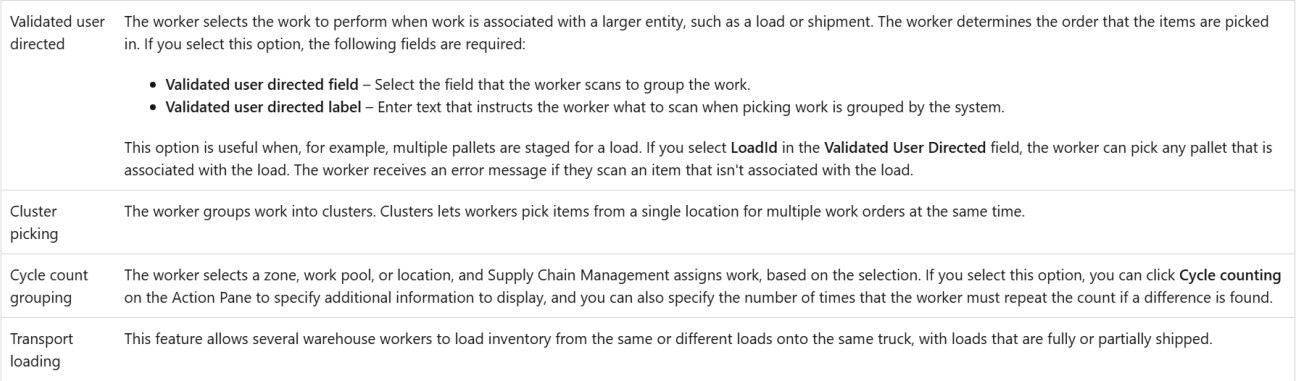
Set the Mode field to Work and select the Use existing work option. Some additional options then become available on the General tab. You can control access to the menu item by assigning one or more work classes on the Work class FastTab. The work classes define the work that the menu item can process. The work class can also be used to grant access to specific user roles or to separate processing for different types of operations. The following table describes the options that are available. The option can be chosen under the Directed by field in
the Mobile device menu items page. In the Mode field, select Work.
Select Yes in the Use existing work field.
- This mobile device menu item is used to perform existing Therefore, you must set this value to Yes.
- The Display inventory status field determines whether the inventory status of the on-hand inventory will be displayed to the warehouse worker on the mobile
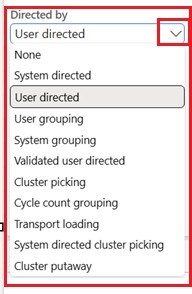
In the Directed by field, either select System grouping. When you select something in
the Directed by field, additional fields appear in the General section on this page. The fields that appear depend on what you selected. When you select System grouping, two new fields are added.
We are choosing Directed by from the drop down

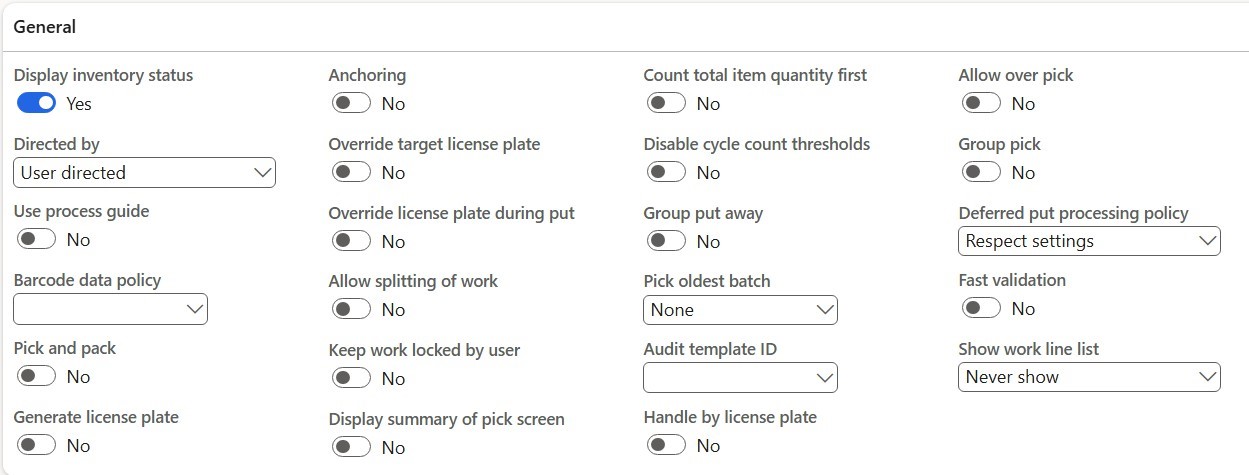
Display inventory status
When enabled, the inventory status will be display on the device. Otherwise, the inventory status will be defaulted.
Directed by
Select the option that indicates how work is assigned in the warehouse.
Use process guide
Select this option to use process guide framework when available.
Barcode data policy
Policy for filling multiple fields based on a single barcode scan
Pick and pack
Select this option to allow workers to combine work for a sales order or load into a single work unit. The worker can perform work only for the sales order or load. For example, this is useful when you must increase a quantity for a sales order after the load, shipment, and work has
been created for the sales order. This option is available when the menu item uses existing work, and the work is directed by the user or system.
Generate license plate
When enabled, a new license plate will automatically be created as needed; otherwise, the worker will have to select an existing license plate.
Anchoring
Select this option to allow workers to specify a location that will override the suggested staging or loading location. All the remaining put away work is directed to the new location. For example, this is useful when a worker is to put items for order 1 in a staging location by Dock 1 but can’t because a previous load hasn’t cleared the location. Rather than waiting for the Dock
1 staging location to become available, the worker decides to use the staging location for Dock 2 instead and overrides the suggested staging location. The put location for all remaining items
for the work order is updated to the Dock 2 staging location. If you select this option, you must specify whether to anchor by shipment or by load in the Anchor by field.
Override target license plate
Select this option to allow workers to specify a target license plate number that differs from the suggested target license plate. Use this option when the first pick for a work order is for the entire quantity of an item on a license plate. For example, this is useful when reusing a pallet.
Override license plate during put
Select this option to allow users to consolidate the quantity on the license plate already on location. When this option is selected, a new flow is available to the user that lets them add quantities on an existing license plate on location.
Override license plate during put
Select this option to allow users to consolidate the quantity on the license plate already on location. When this option is selected, a new flow is available to the user that lets them add quantities on an existing license plate on location.
Allow splitting of work
This option controls whether workers can use more than one license plate to transport items for a single line of picking work. It also affects the way the “Full” button works on handheld devices. Workers use the “Full” button during picking work to indicate that a target license plate is full. If this option is disabled, workers can only use the “Full” button after each pick line is finished,
which means that the full quantity of the current line must be stored at a single target license plate before work can continue. If this option is enabled, workers can select “Full” at any time while picking, and the device will then prompt them to specify the quantity of the current
picking line that has already been loaded onto the target license plate. In both cases, after a worker selects “Full”, the handheld device will display the put location for the current target
license plate and will generate new picking work for the remaining lines (and/or the remaining quantity of a partial line, if permitted).
Keep work locked by user
Select this option to keep work locked by the worker when splitting work. This is useful when, for an example, a target license plate is full, and the worker must add the remaining items to another license plate, and the same worker should be the one to pick up the remaining items once he has dropped off the full target license plate. The remaining picking work stays on the
original work order after the splitting of work and will be locked to the worker who did the split.
Display summary of pick screen
When enabled, a summary of picking work for the selected work order is displayed. The summary is displayed until the first work line is processed for the work order.
Count total item quantity first
Select this option to require a worker to count the total quantity first during a count. If a
difference is found, the worker must provide additional information, such as the license plate number, batch number, serial numbers, and so on.
Disable cycle count thresholds
Select this option to ignore the cycle count thresholds. If selected, cycle count work isn’t created when threshold values are exceeded.
Group put away
Select this option to group the put-away work. This option is available when the work is grouped either by the worker or by the system. When the worker has finished all the picking work in the group, put-away work is created for the same group.
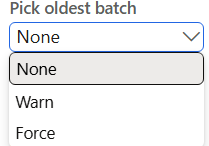
Pick oldest batch
Select the validation level for items that are set to use existing work.
Audit template ID
Select the work audit template that will interrupt the work process for this menu item so that another operation can be performed. For example, if this menu item is for inbound work, the audit template might require that the worker checks the temperature in the delivery container. The point at which the process is interrupted is specified on the audit template and can be, for example, when work is started or completed, or when its status changes.
Handle by license plate
If selected, the worker can scan the license plate and then move the entire license plate, instead of scanning each item individually.
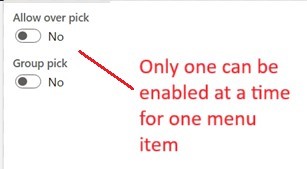
Allow over pick
When enabled, it is possible to pick a larger quantity than specified on the order. Note, the ability to over pick, is only available for workers that are allowed to over pick.
Group pick
Group together pick lines that have the same dimensions. If multiple units of measure are
combined, pick action will be shown in the lowest of these units. For example, if an item has a Unit Sequence Group of Ea. Box PL while there is a line in Box and a line in PL, the pick will be shown in Box.
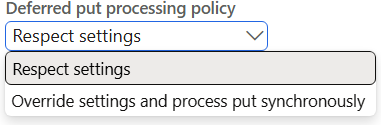
Deferred put processing policy
This option provides some flexibility on the deferred put processing policy. Select “Respect settings” to use deferred put processing as defined on the work processing policy. Select
“Override settings and process put synchronously” to override the setting and process the put synchronously. For the moment work audit templates are not supported. If an audit template id is set on the menu item, deferred put processing policy is ignored and the put operations are processed synchronously.
Fast validation
Fast validation helps improve performance by enabling the mobile app to do validation using
local data, without interacting with the server. This is currently supported when you consolidate license plates and validate catch weight tags during sales picking.
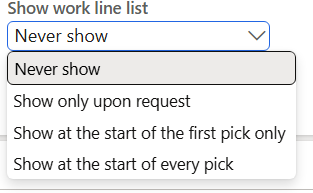
Show work line list
Choose when the warehouse app displays a complete list of lines for the current picking work. This feature provides options that replace the standard “Skip” button. Choose one of the following:
“Show only upon request”: Workers can choose to see the list by selecting the “Skip to” button.
“Show at the start of every pick”: Workers see the list every time they start or complete a pick line and can see it again by selecting the “Skip to” button.
“Show at the start of the first pick only”: Workers see the list each time they start new picking work, but not after each line. They can see the list again by selecting the “Skip to” button.
“Never show”: Provides the standard “Skip” button, thereby disabling the work lines list display.
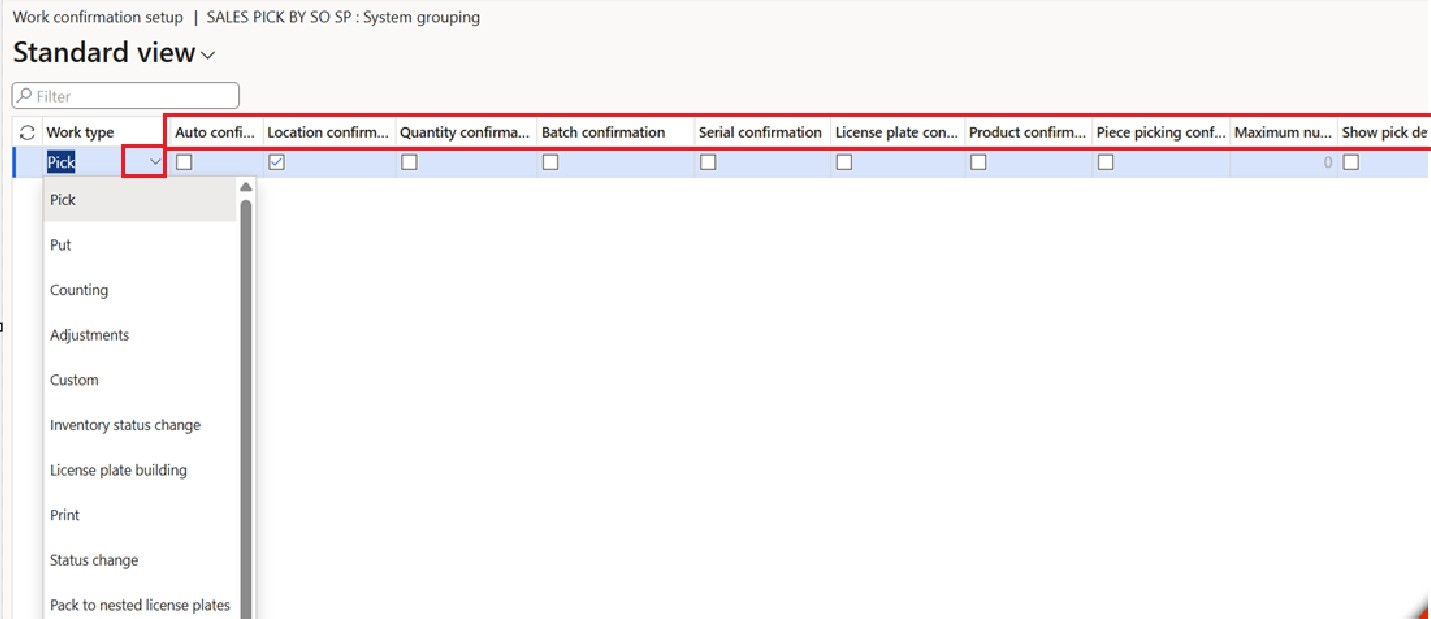
Work conformation setup
Is used to input fields manually in order to confirm that there is no mismatch between the system generated and user inputted value.

Select Work confirmation setup.
- In the Work type field, select Pick.
- Select the Auto confirm check The work instruction with work type Pick will be auto-confirmed. This instruction will not be presented to the user.
- Select New.
- In the Work type field, select ‘Put’.
- Select the Location confirmation check The warehouse worker will be asked to perform a confirmation scan of the location, when the item is put down.
- Select Save.
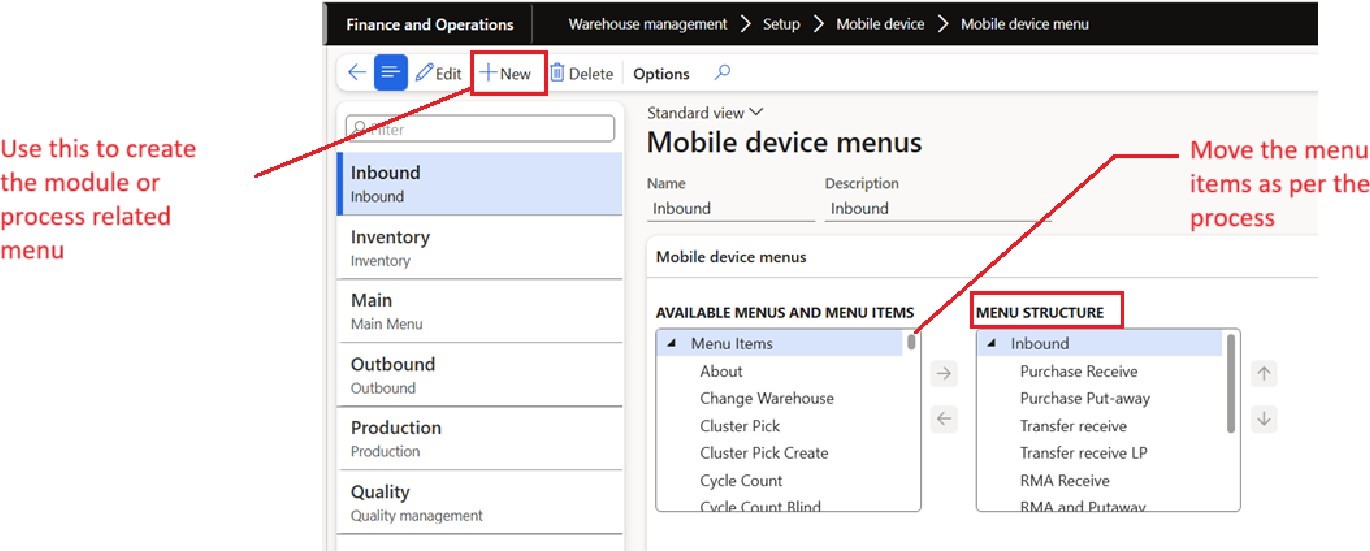
Mobile device Menu
This will help us to setup what all device menu items will be displayed under which module or process
Navigation
Warehouse Management > Setup > Mobile device > Mobile device menu items


Leave a Reply
You must be logged in to post a comment.

